


Installation
______________________________________________________________________________________________
28
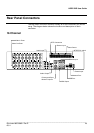
Turning on the DVR
1. Connect camera cables.
2. Connect a network cable and a monitor cable.
3. Connect the power cable to the DVR and wait until the main screen is
displayed on the connected monitor; this process will take approximately
two minutes.
Tip See the Connection Guide section for more details
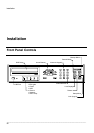
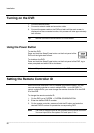
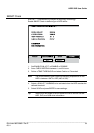
Using the Power Button
To start the DVR:
Press and hold the Setup/Power button on the front panel of the
DVR until the lights start to flash.
To shutdown the DVR:
Press and hold the Setup/Power button on the front panel of the DVR, log in
when prompted and select OK to shut down.
Note Only authorized users can shut down the DVR.
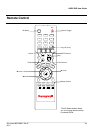
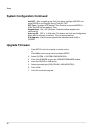
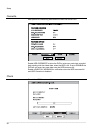
Setting the Remote Controller ID
When more than one HRDP DVR is installed in the same location, you can
use one remote controller to control multiple DVRs – up to 20 DVRs. To
control multiple DVRs, you must change the remote controller ID to the DVR
ID of the DVR.
To change the remote controller ID:
1. On the DVR, go to SYSTEM > SYSTEM CONFIGURATION.
2. Enter the desired DVR ID number.
3. On the remote controller, press and hold the ID button and enter the
desired DVR ID number to operate the corresponding DVR.
Note The DVR ID must be input as two numbers on the remote controller.
You must input 00 for the system ID 0 and input 01 for 1.