


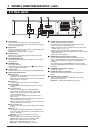
6
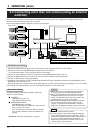
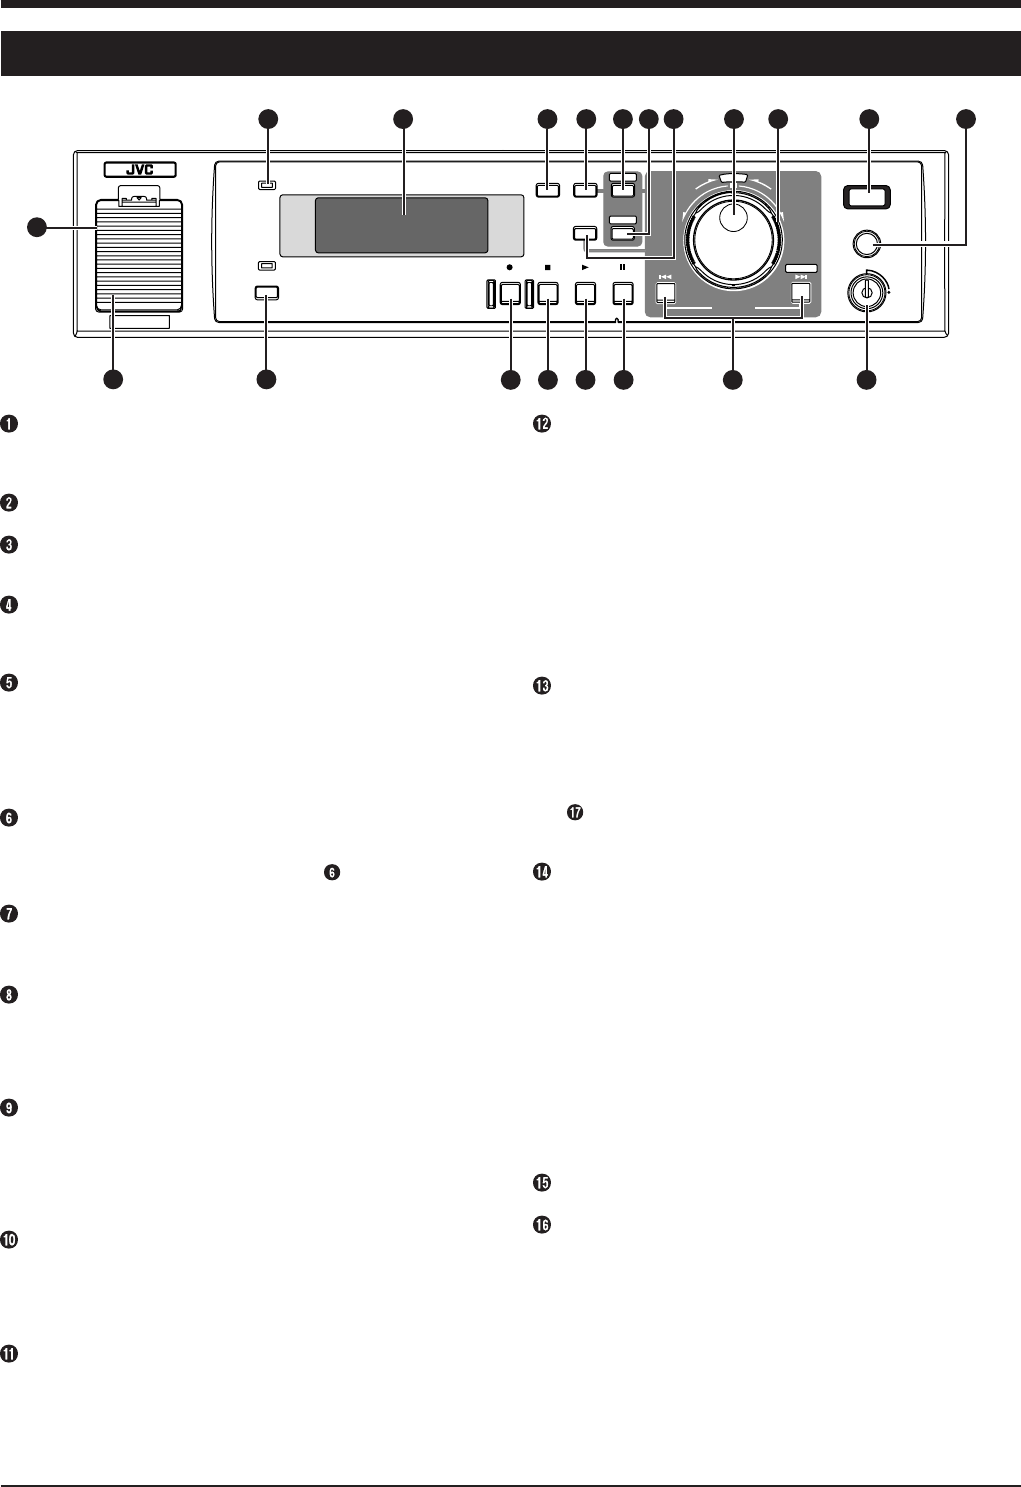
2 CONTROLS, CONNECTIONS AND DISPLAY
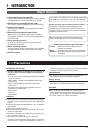
2-1 Front panel
[LITHIUM BATTERY] battery box for memory backup
Install a memory backup battery. When replacing the battery with
a new one, be sure to set the date/time again.
Reference: “4-1 Installing a battery” on page 12.
[POWER] indicator
When the [POWER] switch is turned ON, this indicator lights.
[DISPLAY PANEL]
Shows the operation status or setting details.
Reference: “2-3 Display” on page 8.
[TIMER] button
After programming the timer, press this button to engage the
Standby mode.
Reference: “6-2 Program timer recording” on page 23.
[CANCEL] button
• When a line is selected on the [PROGRAM TIMER] or
[HOLIDAY SET] screen, press this button to clear it.
• When an alarm or warning occurs, press this button to stop the
buzzer.
Reference: “6-2 Program timer recording” on page 26 and “6-4
Alarm recording” on page 28
[MENU] button
Press this button in the Stop mode to display the main menu
setting screen.
*The menu cannot be displayed when the [TIMER] indicator
(see page 8) is on or during recording/playback.
[SEARCH] button
Press to display the search menu for alarm search or time/date
search. Pressing this button again restores the normal screen.
Reference: “7-4 Alarm or day/time direct search” on page 35.
[DISPLAY] display panel switching button
Each time this button is pressed, the display changes in order from
CLOCK to DATE to REMAIN to REC QUALITY-REC SPEED.
•Press [DISPLAY] button in any mode except Record for about 2
seconds. The recording setting display is displayed, allowing
you to set recording quality/number of frames.
Jog dial
In the Play or Still mode, use this dial for frame-by-frame
playback.
Reference: “7-2 Jog/shuttle playback” on page 32.
With the menu/search screen, use this dial to set the item or
value.
Reference: “Jog/shuttle dial operation” on page 16.
Shuttle search dial
Turn to vary the playback speed in the Play or Still mode.
Reference: “7-2 Jog/shuttle playback” on page 32.
With the menu/search screen, use this dial to set the item or
value.
Reference: “Jog/shuttle dial operation” on page 16.
[REC] indicator
Lights when recording on the hard disk.
Blinks during alarm/sensor recording.
Goes out during recording if you set <REC TALLY> of <FRONT
DISPLAY> to “OFF”.
Reference: “5-3 Menu switch details” on page 19.
[CLOCK RESET/CLEAR] button
In the Stop mode, press this button together with the [STOP]
button to reset the second value on the internal clock.
•With 29 seconds or less, the minute value stays the same and
the second value is reset to 00.
•With 30 seconds or more, the minute value is increased by 1
and the second value is reset to 00.
Pressing this button stops recording during alarm/sensor
recording.
When the alarm list screen or power-off list screen is displayed,
pressing this button clears the list.
Reference: “7-4 Alarm or day/time direct search” on page 35.
Use this button to cancel the [AUTO SCAN DISK] function.
Reference: “8-1 Hard disk maintenance” on page 36.
[OPE.LOCK] operation lock key
Set to “ON” position with the provided key to lock switch
operation.
Security levels can be selected with menu switch <OPERATION
LOCK MODE>.
●ALL: Locks all switches.
●REC STOP: Prevents recording from being stopped when the
[STOP] button is pressed.
* Set to “ALL” for timer recording.
Reference: “5-3 Menu switch details” on page 19.
[SKIP/ALARM SEARCH·EXECUTE] SKIP SEARCH·EXECUTE
button
Ⅲ Skip search
In the Stop mode, press this button to go to the start or end of a
recording of the hard disk.
In the Play mode, press this button to start skip search.
There are three types of skip search:
●Time search: Goes to the point a specified time from the
current point.
●Event search: Goes to the start of an event recording.
●Alarm search: Goes to the start of an alarm recording.
Reference: “7-3 Skip search” on page 33
Ⅲ EXECUTE button
Use this button to execute alarm direct search, day/time direct
search or “disk scan”/ “quick format”.
Reference:“7-4 Alarm or day/time direct search” on page 35 and
“8-1 Hard disk maintenance” on page 36
[STILL] button
In the Play mode, press this button to engage the Still mode.
[PLAY] button
Press this button to start playback.
●In the Stop mode: Playback starts at the position where
playback was last stopped.
* Just after the power is turned ON, playback starts from a point
about 5 seconds before the end point of the last recording.
●In the Record mode: Simultaneous Playback mode is
engaged.
Reference: “Simultaneous Playback mode” on page 31.
7 8
POWER
WARNING
SLEEP
REC STOP PLAY STILL
TIMER CANCEL
DISPLAY
MENU
SEARCH
S
E
L
E
C
T
REV FWD
EXECUTE
SKIP/ALARM
SEARCH
REC
CLOCK RESET/ CLEAR
OPE. LOCK
ON
DIGITALVIDEORECORDER VR-510U
12
9
10 11
456
13
15161718
1920
14
1
2
3
*Behind
the cover