


7
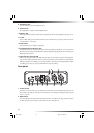
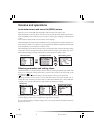
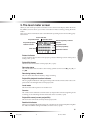
Parts of the MR-1000
Front panel
1
2
4
5
6
7
8
9
10
11
12
13
14
3
1. Recording level L/R knobs
These adjust the recording level. Set the display to the level meter screen so you can watch
the levels, and make adjustments while watching the peak LED (3.). The outside knob ad-
justs the Left recording level, and the inside knob adjusts the Right recording level.
Hum or noise may occur if you raise the recording level when nothing is connected to the input
jacks.
2. Display
The display shows the level meters and counter during recording and playback, and can
also show information about the project (→p.14) or file, and parameter settings.
3. Peak LEDs
These will light according to the input level. Adjust the input level so that these do not light
red.
4. Menu button
This button accesses the menu list (MENU) screen, allowing you to choose the information
or the parameters that will be displayed. Each time you press this, you will alternate be-
tween the level meter screen and the menu screen. You can also use this button to return
from an editing screen to the previous screen.
5. Rewind button
Use this button to select a project (→p.14) or file, or to rewind.
6. Fast-forward button
Use this button to select a project (→p.14) or file, or to fast-forward.
7. Power button
This turns the MR-1000 on or off (standby).
When you turn this off, the shutdown process will occur automatically; do not disconnect the
AC adaptor or remove the batteries until the shutdown procedure is complete and the display
has gone dark.
Text1_E.p65 06.11.22, 1:22 PM7