


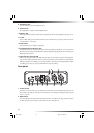
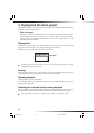

8
8. Headphone jack
You can connect a set of headphones here.
9. Volume knob
This adjusts the volume of the headphone jack.
10. Battery LED
When operating on batteries, this LED will light red if the remaining battery capacity is low.
11. P-dial
This is a dial with a push-switch function. For more about how to operate it, refer to "Screens
and operations" on 10 page.
12. Stop button
This button stops recording or playback.
13. Playback/Pause button,Play LED
This button starts recording or playback. During recording or playback, you can press this
button to pause (temporarily halt).This LED will light during playback, and will change to
blinking while paused.
14. Record button, Record LED
When you press this button, the MR-1000 will enter record-ready mode (record LED blink-
ing), and recording will begin when you then press the play/pause button (record LED lit).
During playback or recording, you can store a Mark (→p.21) by pressing this button. While
recording is paused, you can press this button to stop recording.
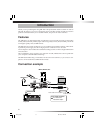
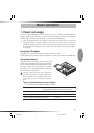
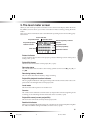
Rear panel
7
2
5
66
3
4
1
88
1. Limiter switch
Turn this on if you want to prevent distortion caused by an unexpectedly high input level.
The limiter can help prevent input overloads from occurring by limiting the input signal
levels. (→p.20).
2. GAIN switch
This switches the input gain between high/low (H/L). Set this to the appropriate position
for the input device, in order to achieve the correct recording level.
Text1_E.p65 06.11.22, 1:22 PM8