


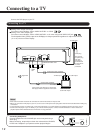


Connections
Introduction
13
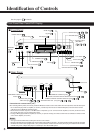
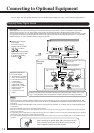
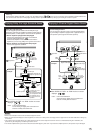
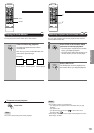
Connecting to an Audio System or TV with COMPONENT VIDEO Inputs
• Refer to the instruction manual of the connected equipment as well.
• When you connect the DVD player to other equipment, be sure to turn off the power and unplug all of the equipment from the wall
outlet before making any connections.
• If you place the DVD player near a tuner or radio, the radio broadcast sound might be distorted. In this case, place the DVD player
away from the tuner and radio.
• The output sound of the DVD player has a wide dynamic range. Be sure to adjust the receiver’s volume to a moderate listening level.
Otherwise, the speakers may be damaged by a sudden high volume sound.
• Turn off the amplifier before you connect or disconnect the DVD player’s power cord. If you leave the amplifier power on, the speakers
may be damaged.
To audio inputs
of the amplifier
Audio system
Power plug
The shape of the
power plug may
differ according
to the model and
the area where
the unit is
purchased.
You can listen to the sound of audio CDs and DVD video discs in stereo and enjoy the enhanced picture quality of
DVD video discs on a TV with COMPONENT VIDEO inputs.
To Y
VIDEO
OUT
To Cb
VIDEO
OUT
To Cr
VIDEO
OUT
(red)
(white)
To wall outlet
To ANALOG AUDIO OUT
(white)
(red)
TV or monitor with
component signal inputs
Some TVs or monitors are equipped with color difference inputs. Connecting to these inputs allows you to enjoy higher quality picture
playback.
Actual labels for color difference inputs may vary depending on the TV manufacturer. (ex. Y, B-Y, R-Y etc.)
In some TVs or monitors, the color levels of the playback picture may be reduced slightly or the tint may change. In such a case, adjust
the TV or monitor for the optimum performance.
To Y video input
To Cr video input
To Cb video input
Signal flow
Notes:
COMPONENT VIDEO OUT (COLOR DIFFERENCE):
Connecting to an Audio System or TV with
COMPONENT VIDEO Inputs
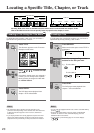
■ Setting of the output sound type
From the on-screen displays, set the “AUDIO OUT SEL.” to “PCM”. 31 , 32
■ Setting of the video output type
From the on-screen displays, set the “VIDEO OUT SEL.” to “C” when using the COMPONENT VIDEO OUT jacks
(Y, Cb, Cr). 31 , 33
VIDEO OUT
S VIDEO
R
L
ANALOG
OUTPUT
PCM/AC-3
DIGITAL
REMOTE
CONTROL
COAXIAL OPTICAL
YCbCr