


7
EN
OPERATING TV OPERATING DVD SETTING DVD
INTRODUCTION
PREPARATION
SETTING TV
TROUBLESHOOTING
ESPAÑOLINFORMATION
REMOTE CONTROL FUNCTION5
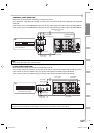
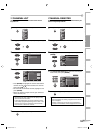
1
2
3
4
5
6
7
8
9
10
11
12
13
14
15
16
17
18
19
20
21
22
23
24
11
25
26
27
28
29
30
31
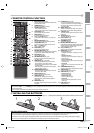
1. INPUT SELECT button (p19)
Press to access connected external devices like
a DVD recorder or VCR.
2. POWER button (p13)
Press to turn TV/DVD on and off.
3. Number buttons (p17)
• Press to select a channel.
• Press to input number of title, chapter or track.
4. SETUP button (p21)
Press to display on-screen menu.
5. ENTER button (p13)
Press to confirm your selection.
6.
s
/
B
/
K
/
L
buttons (p13)
To move left/ right/ up/ down through the
items.
7. BACK/RETURN button (p19)
Press to return to previous menu operation.
8. CH RETURN button (p17)
Press to return to previously viewed channel.
9. VOL.
X
/
Y
buttons (p17)
Press to adjust volume.
10. MUTE button (p17)
Press to turn sound off and on.
11. SKIP H / G buttons (p34)
To skip forward or backward chapters, titles (DVD),
tracks (CD, MP3, JPEG) or folders (MP3, JPEG).
12. PAUSE button (p30)
To pause disc playback.
13. DISC MENU button (p30 / p32)
To call up the menu on a disc (DVD) or FILE
LIST (MP3, JPEG).
14. MODE button (p33 / p36 / p38)
• To call up the FOLDER LIST on a disc when
“Dual Playback“ is “ON“ (MP3, JPEG).
• To arrange the playing order or play randomly
(CD, MP3, JPEG).
• To set black level (DVD) and virtual surround
(DVD, CD, MP3) on or off.
15. SEARCH MODE button (p34)
• To search chapter, title (DVD), time (DVD, CD)
or track (CD, MP3, JPEG).
16. SUBTITLE button (p38)
To select subtitles on a disc (DVD).
17. ANGLE button (p38)
To change the camera angle to see the
sequence being played back from different
angle (DVD).
18. ZOOM button (p31)
To magnify the part of picture (2X and 4X: DVD,
2X: JPEG).
19. CLEAR button (p35 / p36)
• To clear the numbers entered incorrectly.
• To cancel the point A for A-B repeat (DVD, CD).
• To remove track number in program input
(CD, MP3, JPEG).
20. REPEAT button (p35)
To play a chapter or title (DVD), track, disc (CD,
MP3, JPEG) or group (MP3, JPEG) repeatedly.
21. A-B button (p36)
To repeat between your chosen point A and B
(DVD, CD).
22. TITLE button (p30)
To call up the title menu (DVD).
23. PLAY B button (p30)
To begin disc playback.
24. STOP C button (p30)
To stop disc playback.
25. REV E / FWD D buttons (p31)
To begin slow forward or slow reverse playback
during the pause mode (DVD) and search for-
ward or backward through a disc.
26. CH K/L buttons (p17)
To select channels and external input mode.
27. INFO button (p19 / p37)
• Analog mode (TV)
To display channel No., signal type and TV
setting.
• Digital mode (DTV)
To display channel information, signal type
and TV setting.
• External input mode
To display external input mode, signal type
and TV setting.
• DVD mode
To display the current status (DVD, CD, MP3,
JPEG).
28. SCREEN MODE button (p20)
To select aspect ratios available for the screen.
29. SLEEP button (p21)
Press to activate the sleep timer.
30. AUDIO button (p18 / p39)
• Analog mode (TV)
Selects audio mode.
• Digital mode (DTV)
Selects audio language.
• DVD mode
Selects audio language (DVD) or sound
mode (CD).
31. EJECT button (p30)
To eject the disc.
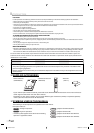
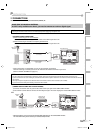
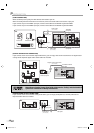
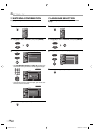
INSTALLING THE BATTERIES
Install two AA batteries (included) matching the polarity (++/
-
-
) indicated inside battery compartment of the remote control.
123
5
NOTE:
• With buttons [VOL. X/Y] or [MUTE], you can only adjust the volume of the main unit. You cannot adjust the volume of the external devices
with these buttons.
• Unless stated, all operations described are based on remote control use.
BATTERY PRECAUTIONS:
• Be sure to follow the correct polarity as indicated in the battery compartment. Reversed batteries may cause damage to the device.
• Do not mix different types of batteries together (e.g. Alkaline and Carbon-Zinc) or old batteries with fresh ones.
• If the device is not to be used for a long period of time, remove the batteries to prevent damage or injury from possible battery leakage.
• Do not try to recharge batteries not intended to be recharged; they can overheat and rupture.
L4360UA.indd 7L4360UA.indd 7 2006/11/21 15:41:242006/11/21 15:41:24