


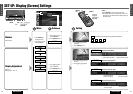

Notes:
¡Press [MODE] to return to the regular mode.
¡The display returns to the previous one if there is no
operation for more than 60 seconds after changing to
the setting menu.
3
Setting
[}] [{]
[] ][[ ]
(Select/adjust)
[ENTER]
[MODE]
(End)
[MENU]
[0] to [9]
VOLUME
MENUMUTE MODE NAVI
NAVIGATION ASPECT
P
·
MODE
POWER
ASP
ENTER
CQ-VD7200U
IN-DASH 7 INCH WIDE COLOR LCD TV / DVD - VIDEO / RECEIVER
DISC
TRACK/
CHANNEL
MENU MODE
ENTER
40 41
31
E
N
G
L
I
S
H
32
E
N
G
L
I
S
H
CQ-VD7200U CQ-VD7200U
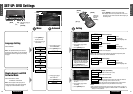
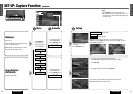
Rear view camera input
: unconnected
: connected to the VTR1-IN
: connected to the VTR2-IN
Note: Make sure to select “OFF” when no rear view camera is connected.
Rear view camera scale display
: scale display off
: scale display on
Scale adjustment
Press [[]
or []] to adjust the width.
Press
[}] or [{] to adjust the angle.
SCALE ADJUST
ON
OFF
SCALE
VTR2
VTR1
OFF
CAMERA INPUT
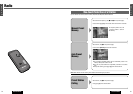
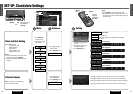
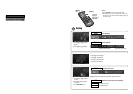
How to set your ID code (for the first time)
q
Enter an 4 digit ID code.
w Enter the same
4 digit
ID code again.
How to change your ID code
q
Enter the preset (old)
4 digit
ID code. If the wrong ID code is entered, a
new ID code cannot be registered.
w Enter a new
4 digit
ID code.
e Enter the new
4 digit
ID code again.
How to cancel the known ID code
Note: Should your unit ever require service, cancel your ID code before send-
ing for repair.
q Enter the preset (old)
4 digit
ID code. If the wrong ID code is entered, it is
not possible to cancel the ID code function.
w Press and hold [ENTER] until
“
Complete!
” is displayed
. The ID code can-
celling procedure is completed. The unit now works without an ID code.
Note:
Refer to ID Code Input regarding how to enter the ID code. (a page 11)
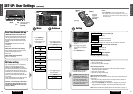
ID Code setting
Prior to operating this unit, it is advisable to
assign your 4-digit ID code for security.
(Make sure to use four digits for ID code.)
Once the ID code has been set, the unit cannot
be operated if the main power supply is dis-
connected then re-connected. It is electronical-
ly locked so that a thief could not use the
stolen unit unless that person knows the code
you have set.
The ID code operation must be performed only
by the person whom the unit belongs to.
Generally, it is not necessary to enter the ID
code each time when using the unit if it has
not been disconnected from the main power
supply (car battery).
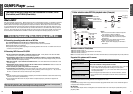
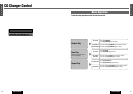
SET-UP: User Settings (continued)
Rear View Camera Set up
CAMERA INPUT (Rear view camera input)
Selection of the terminal that connects to the
rear view camera allows you to view images
through the rear view camera automatically
when you put the shift lever into the reverse
position.
Preparation: Connect the reverse lead.
(a page 81)
Default: OFF
SCALE (Rear view camera scale display)
Images through the rear view camera can be
shown in the scale display mode.
Default: OFF
SCALE ADJUST (Scale adjustment)
Default: 0 (width/angle)
1
2
[}] [{] []] [[]
(Select/adjust)
[ENTER]
[MENU]
q
Press [}] or [{] to
select
“
CAMERA SETUP
”
.
w Press [ENTER] to set.
CAMERA SETUP
q Press [}] or [{] to
select
“
ID-CODE
”
.
w Press [ENTER] to set.
ID-CODE
[MODE]
(End)
Menu
Submenu
Press [0] to [9] on the remote
control to input the ID code.
q Press [}] or [{] to select
an item.
w
Press [[] , []] , [}] or
[{]
to select or adjust the
setting.
e Press [ENTER] to set.
Caution: Record your regis-
tered ID code and keep it in a
secure location. If you forget it,
you will be unable to use the
unit. In case you forget the ID
code, please consult your near-
est Panasonic Servicenter.
q Press [MENU] to
display the menu.
w
Press [[] or []] to
select “USER”.
AUDIO
CAPTURE
DATE
DVD
SCREEN
USER