Pelco Manual C1927M (5/99) 23
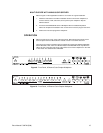
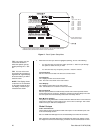
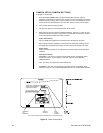
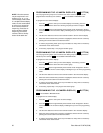
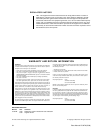
RECORD SETUP (DISPLAY/RECORD BUTTON)
To program the VCR recording parameters:
1. Press the DISPLAY/RECORD button for approximately three seconds. Type the
password, if requested. The Record Setup menu appears.
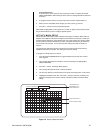
2. The currently selected menu item blinks.
3. Use the arrow buttons to move between items on the screen.
4. When the menu item you desire is highlighted (blinking), press the +/- button to cycle
through the options to select the one you want.
Record Speeds
Sets the speed at which the VCR normally records video and the speed at which it
records when there is an alarm(s). Setting the speeds in the Record Setup menu also
sets the speeds in the System Setup and Custom VCR Setup menus.
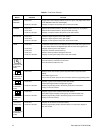
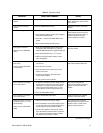
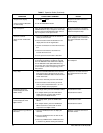
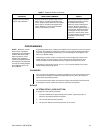
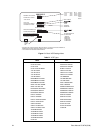
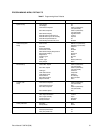
VCR Type
See Table D. If your VCR is not listed among the options, do either of the following:
• Select UNIVERSAL. In the recording speed menu item at the top of the screen,
select an option that your VCR will support.
• Select CUSTOM. Then go to CONFIGURE CUSTOM VCR and press the +/-
button to go to the Custom VCR Setup menu. The switch interval can be
changed only while in this setting.
VCR Video Format
Composite is standard video on a coaxial cable. SVHS is higher resolution video on a
special cable. This feature is not available on monochrome units.
VCR Switch Pulse
ENABLED means the multiplexer waits for a head switching pulse from the VCR. If the
multiplexer does not get a pulse from the VCR (because of a broken wire or the VCR
does not give a pulse in some modes), it may appear that the multiplexer is not
working properly.
DISABLED means the VCR head switching pulse is not used.
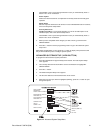
Alarm Handling
Determines how alarms are recorded and for how long.
AS A PRIORITY updates and records camera(s) with an alarm more often than
camera(s) without an alarm.
ONLY records only camera(s) with an alarm.
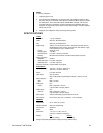
Configure Custom VCR
Press the +/- button to get to the CUSTOM VCR SETUP menu.
Playback Format
Tapes made using Pelco, Robot, and DM multiplexers can be played.
5. When you have completed all the changes you want to make, go to EXIT.
6. Press the +/- button to exit the programming mode.
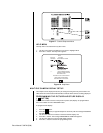
When HELP is highlighted, you may press the +/- button to display a help screen that will
tell you which buttons to press to configure specific options.