


Pelco Manual C681M-D (2/02) 17
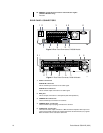
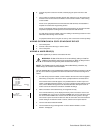
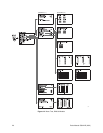
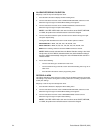
<DEVICE CHECK>
SCSI ID0:HDD (30GB)
ID1:HDD ( 9GB)
ID2:NONE
ID3:NONE
ID4:NONE
ID5:NONE
INITIALIZE ALL HDD
BOOT UP DELAY 00
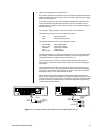
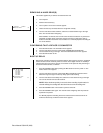
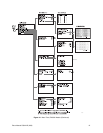
ID5:RDD
PWR-OFF CONFIG.
BOOT UP DELAY 00
REMOVING A HARD DRIVE(S)
This section applies only to devices removed from ID1-ID3.
1. Turn off power.
2. Remove the hard drive(s).
3. Turn on power. The screen to the left appears.
4. Make sure that any connected device is recognized correctly.
5. Turn the JOG dial to select CONFIG., and then turn the SHUTTLE ring to the right
twice. The recorder starts configuring.
When CONFIG. is selected, the recorder saves the data recorded on any connected
peripheral recording device (which has not been removed) as well as the data re-
corded on the built-in hard drive. Data recorded on a removed peripheral recording de-
vice is not affected.
CONFIRMING THAT A DEVICE IS CONNECTED
1. Press the INFO button. The Information menu appears.
2. Turn the JOG dial to move the cursor beside CONNECTED SCSI DEVICE.
3. Turn the SHUTTLE ring to the right. The Connected SCSI Device menu appears.
4. Press the INFO button to exit.
BOOT-UP DELAY
Because the recorder searches for connected devices when power is turned on, peripheral
devices must be turned on before power is turned on to the digital recorder. To handle pe-
ripherals that take a long time to start up, the recorder can be preset to delay the timing of
its search for these devices, as follows.
1. Press the POWER button while pressing the REC button to turn the power on. The
Device Check menu appears.
2. Turn the JOG dial to move the cursor beside BOOT UP DELAY, and then turn the
SHUTTLE ring to the right. The boot-up delay option starts flashing.
3. Turn the JOG dial to set the delay time, and then turn the SHUTTLE ring to the right.
You can set the time from 00 to 99 seconds.
NOTE:
When the boot-up delay is set and a timer recording is performed, the
recorder will begin recording later than the time set as the recording time.
4. Press the POWER button. The recorder’s power is turned off.
5. Press the POWER button again. The recorder starts configuring after the preset de-
layed time has passed.
If a different peripheral recording device was connected since the last time the re-
corder was booted up, the Device Check menu appears.