


28 Pelco Manual C681M-D (2/02)
AUDIO RECORDING
The recorder can record audio with an image.
Skip steps 1 and 2 if they have already been done.
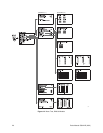
1. Press the SET UP button to display the Menu Setting menu.
2. Turn the JOG dial to move the cursor to INITIAL SET UP, and then turn the SHUTTLE
ring to the right. The Initial Set Up menu appears.
3. Turn the JOG dial to select AUDIO RECORDING, and then turn the SHUTTLE ring to
the right. The option starts flashing.
NOTE:
If the PRE A-REC field in the A-Rec/M-Det Setting menu has been set to
SHORT, MEDIUM, or LONG, the option does not flash because it cannot be
changed.
4. Turn the JOG dial to select ON or OFF, and then turn the SHUTTLE ring to the right.
The option stops flashing.
NOTE:
When the audio recording setting is set to ON, the available recording
time and audio indicator (speaker icon) appear in the ESTD TIME in the Normal
Rec Setting menu. Also, on DX3009 models PRI settings of 2-5 are automatically
changed to 1 in the DEFINE GROUP setting in the Normal Rec Setting menu
and in the DEFINE ALARM GROUP setting in the A-Rec/M-Det Setting menu.
NOTE:
Depending on the setting of the image quality and the maximum
recording fields, audio recording may not be available. If so, a speaker icon with a
line through it appears next to the ESTD TIME in the Normal Rec Setting menu.
5. Do one of the following:
•Turn the JOG dial to go to another item in this menu.
•Turn the SHUTTLE ring to the left to return to the Menu Setting menu to go to
another menu.
• Press the SET UP button to exit the programming mode.
AUTO EJECT
This setting is for automatically ejecting the medium in the archive device.
If set to ON, the medium is ejected under the following conditions:
• At the completion of the backup process
• At the end of the programmed time, if the back up is made with the timer program
• When the archive in progress is cancelled
If you set to OFF, the archive medium is not ejected.
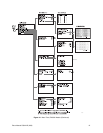
Skip steps 1 and 2 if they have already been done.
1. Press the SET UP button to display the Menu Setting menu.
2. Turn the JOG dial to move the cursor to INITIAL SET UP, and then turn the SHUTTLE
ring to the right. The Initial Set Up menu appears.
3. Turn the JOG dial until the cursor is next to AUTO EJECT, and then turn the SHUTTLE
ring to the right. The option flashes.
4. Turn the JOG dial to select ON or OFF, and then turn the SHUTTLE ring to the right.
The option stops flashing.
NOTE:
This menu item
does not appear unless an
archiving device is con-
nected to the recorder.