


16 Pelco Manual C681M-D (2/02)
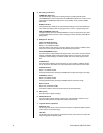
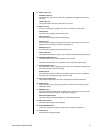
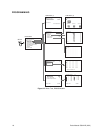
<DEVICE CHECK>
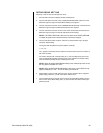
SCSI ID0:HDD (30GB)
ID1:HDD ( 9GB)
ID2:NONE
ID3:NONE
ID4:NONE
ID5:NONE
PWR-OFF INITIALIZE
BOOT UP DELAY 00
ID4:RDD
ID5:DDS
PWR-OFF
BOOT UP DELAY 00
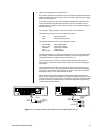
6. Connect the power cord to the recorder, and then plug the power cord into a wall
socket.
7. Turn on power to peripheral recording devices first, and then turn on the power to the
recorder. Power to the cameras and monitor can be turned on before or after turning
on the recorder.
If there are no peripheral devices connected to the SCSI terminal, the installation is
complete. Proceed to the
Programming
section.
If there are peripheral devices connected to the SCSI terminal, the recorder automati-
cally detects peripheral recording devices connected to the SCSI terminal.
If a hard drive(s) has been added, refer to the
Adding a Hard Drive(s)
section for more
information about turning on the recorder.
If a peripheral device takes a long time to start up, refer to the section on
Boot-Up Delay.
ADDING OR REMOVING A COPY OR ARCHIVE DEVICE
1. Turn off the power.
2. Connect or disconnect the copy or archive device.
3. Turn on the power.
ADDING A HARD DRIVE(S)
This section applies only to devices connected to ID1-ID3.
WARNING:
All data will be lost on the current drive(s) after you install an
additional hard drive(s) and turn the power back on. Back up data you want
to save before turning off the power to add a hard drive(s).
NOTE:
The DX3000 uses the native format of the added drive(s); therefore, any
added drive(s) do not have to be reformatted.
Up to two (DX3009-060) or three (DX3009-030) peripheral hard disk drives (maximum of 34 GB
per unit) can be added to supplement the built-in hard disk when extended recording time is
needed.
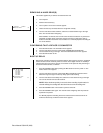
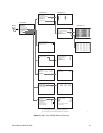
1. If a hard drive(s) has been added, a screen similar to the first one on the left appears
after turning on the power. This screen shows a peripheral device connected to ID1.
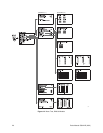
If the second screen to the left appears, it is possible that there is either a poor con-
nection, overlapping SCSI ID numbers, or an error in SCSI ID number settings. In this
case, turn the SHUTTLE ring twice in the clockwise direction. Main power to the re-
corder is turned off. Check the connection and SCSI ID settings.
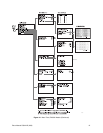
2. Make sure that the connected device(s) is recognized correctly.
If the connected device(s) is not displayed correctly, make sure that the cursor is be-
side POWER OFF. If the cursor is not beside POWER OFF, turn the JOG dial to move
the cursor beside POWER OFF, and then turn the SHUTTLE ring twice to the right.
The recorder’s power is turned off. Make sure that the connection of the external device
and the setting of the SCSI ID number is correct, and then turn the power back on.
3. Turn the JOG dial to select INITIALIZE.
4. Turn the SHUTTLE ring to the right when “Turn the SHUTTLE RING >> to EX-
ECUTE.” is displayed.