


Pelco Manual C681M-D (2/02) 53
11. Repeat steps 8-10 for the ending time.
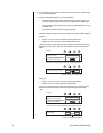
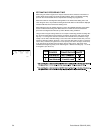
A dot between the columns for the starting and ending times indicates that the record-
ing time overlaps into the following day; for example, if you select 5 p.m. to 8 a.m.
12. Set the MODE column.
Use the JOG dial to select the option, and then turn the SHUTTLE ring clockwise.
Turning the JOG dial switches the options as follows:
A, B, C, SKIP, ARC, POWER
A, B, C: These are the recording modes. For more information, refer to
Select Re-
cording Mode
in the
Record
section.
SKIP: The SKIP setting can be used to stop the recording temporarily. Recording will
stop for the specified time frame, and the unit’s main power will automatically turn off.
ARCHIVE: This setting is used for making back-ups of data stored in the unit’s hard
disk drive.
POWER: Used when alarm recording is set with the timer. This setting keeps the unit
idle, but with the power on, during the specified time frame. Recording starts when
•
An alarm is triggered at one of the ALARM IN connectors on the back of the recorder
• Motion is detected (refer to the next section,
Motion Detection During a Timer Re-
cording
, to set up the motion detection option, which is available on DX3016 mod-
els only)
EJECT: (DX3016 Models Only) After backing up the recording contents of the hard
disk drive to the backup device, the recording medium is ejected automatically.
13. If option A, B, or C was selected, the cursor moves the to field for setting the maximum
recording fields. Use the JOG dial to select the desired interval, and then turn the
SHUTTLE ring to the right.
Turning the JOG dial switches the options as follows:
DX3009 Models – 1, 3, 5, 7.5, 15, 30F
DX3016 Models – 1, 3, 5, 6, 7.5, 10, 15, 30
NOTE:
If the motion detection setting in the Initial Set Up menu is turned ON,
option 30 is not available on the DX3009 models, and options 6, 10, and 30 are
not available on the DX3016 models.
14. To set other programs, repeat steps 6-13. Up to eight programs can be set per screen.
NOTE:
All fields in a program entry must be filled in before you can move to
another entry line.
NOTE:
To erase a program entry, press the WARNING RESET button.
The cursor must be in the DW field.
15. If you entered SPL in the DW column, set the days of the week as follows:
a. Turn the JOG dial to move the cursor to select SPECIAL DW, and then turn the
SHUTTLE ring to the right.
b. Turn the JOG dial to select the beginning day, and then turn the SHUTTLE ring to
the right.
c. Turn the JOG dial to select ending day. The settings for the starting and ending
days cannot be identical. Turn the SHUTTLE ring to the right. The flashing stops.