14 C1680M (1/06)
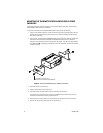
MOUNTING THE TRANSMITTER INTO AN EH2515 SERIES
ENCLOSURE
The following procedure provides instructions to mount the FT8301A transmitter into an existing
EH2515 Series enclosure installation.
To mount the transmitter into an EH2515 Series enclosure, do the following:
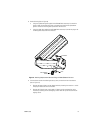
1. Using a small Phillips screwdriver, remove the left and right wall-mounting brackets that are
attached to the transmitter by loosening the four 4-40 x 0.25-inch Phillips pan head screws
(two screws each side).
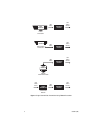
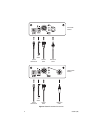
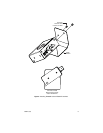
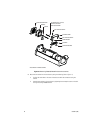
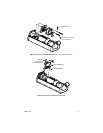
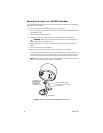
2. Using the EH2500 bracket and the two 4-40 x 0.187-inch Phillips flat head screws supplied in
the EH2500 accessory kit, attach the bracket to the transmitter (refer to Figure 5). Note that
the transmitter must be positioned at an angle within the bracket.
3. Disconnect power to the enclosure.
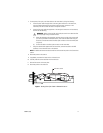
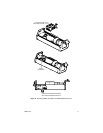
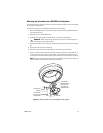
4. Remove the camera sled from the enclosure by doing the following:
a. Using a 5/64-inch hex wrench, loosen the screws on the back of the enclosure.
b. Pull the “T” handle until heater wiring connectors, if present, are visible, and then
disconnect the heater wiring connectors.
WARNING: Damage to the heater wires can occur if the sled is pulled out too far
before the wiring connectors are separated.
c. Slide the camera sled out of the enclosure.
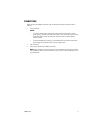
5. Disconnect power wires and video cable from the connectors on the camera.
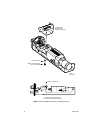
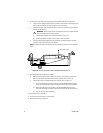
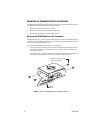
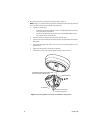
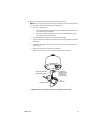
6. Mount the EH2500 bracket and attached transmitter into the enclosure by doing the following
(refer to Figure 6):
a. Position the EH2500 bracket onto the camera sled so that the connectors on the
transmitter face the camera.
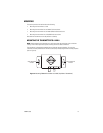
b. Attach the EH2500 bracket to the camera sled using the 10-32 x 0.375-inch Phillips pan
head screw and lock washer supplied in the EH2500 accessory kit.