


13
RQT8203
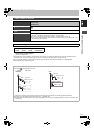
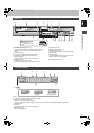
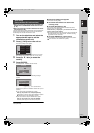
1 Standby/on switch (Í/I) (➡ 18, 19)
Press to switch the unit from on to standby mode or vice versa. In
standby mode, the unit is still consuming a small amount of
power.
2 Disc tray (➡ 22, 30)
3 Connection for digital video (DV) camcorder (➡ 47)
4 Lights when “FL Display” is set to “Bright” (➡ 56)
5 SD card slot (➡ 6)
6 Lights when the HDD, DVD or SD drive is selected
7 Display (➡ below)
8 Connection for camcorder etc. (➡ 47)
9 Linked timer recordings with external equipment (➡ 29)
: Channel select (➡ 22)
; Open/close disc tray (➡ 22, 30)
< Select drive (➡ 22, 30, 34)
Drive changes each time you press [DRIVE SELECT].
= Stop (➡ 22, 31)
> Start play (➡ 30)
? Start recording/Remote control signal sensor (➡ 22)
Specify a time to stop recording (➡ 23)
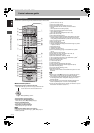
Rear panel terminals (➡ 15, 16)
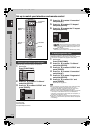
2 Transferring (dubbing) indicator
3 Linked timer recordings with external equipment indicator
4 D.MIX (multi-channel DVD-Audio only)
When lit: Down-mixing (➡ 68) is possible.
When off: The disc prevents down-mixing so only the two front channels can be played (➡ 10, Regarding DVD-Audio)
5 Recording mode
6 Disc type
7 Lights when the HDD, DVD or SD drive is selected
8 Main display section
9 Timer recording indicator
Main unit
HDD
DVD SD
EXT LINK
CH
DRIVE
SELECT
REC
S VIDEO IN
VIDEO IN
L/MONO
-AUDIO IN-
AV3
R
/k1.3
1.3
OPEN/CLOSE
DV IN
12
3
4
5
6
7
8
9
:
;
<
=
>
?
Opening the front panel
Press down on the
part with your finger
The unit’s display
XP
SP
LP
EP
CH
DUB
EXT
D.MIX
Link
DVD
AVCD
RWRAM
VR
SD
-
+
-
PLAY
REC
DVD
SD
HDD
REC
PLAY
PLAY
HDD
REC
HDD
PLAY
HDD
REC
PLAY
123456
78 9
1 e.g.,[HDD]
Recording
Playback
Recording/Playback
13
Control reference guide
EH60.book Page 13 Monday, June 27, 2005 8:46 PM