


29
RQT8203
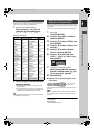
≥Even when the unit is turned off, you can display the timer
recording list by pressing [PROG/CHECK].
Press [PROG/CHECK].
∫ To change a programme
Press [3, 4] to select the programme and press [ENTER].
(➡ 28, step 3)
∫ To delete a programme
Press [3, 4] to select the programme and press [¢ CANCEL].
∫ To exit the timer recording list
Press [PROG/CHECK].
∫ To put the unit on timer recording standby
Press [F TIMER].
“F” lights on the unit’s display to indicate timer recording standby
has been activated.
≥Programmes that failed to record are deleted from the timer
recording list at 4 a.m. two days later.
[HDD] [RAM] [-R] [-RW‹V›] [+R]
To make a timer recording with your television, connect to a
television with a Q Link function (➡ 69) that you can use for setting
timer recordings using a fully wired 21-pin Scart cable (➡ 15).
1 Make timer programming on the TV.
2 Press [HDD] or [DVD] to select the recording
drive.
If you selected the DVD drive, insert a disc (➡ 22).
3 Turn off this unit.
The start and end of recording is controlled by the TV.
To stop recording
Press [
∫
].
[Note]
≥When this unit is in timer recording standby or EXT LINK standby
(“F” or “EXT Link” is shown on the unit’s display), recording from
television does not start.
≥Programmes are recorded as one title on this unit when the end
time of the earlier timer recording and the start time of the later
timer recording are close to each other. To divide the titles, go to
“Divide Title” (➡ 39).
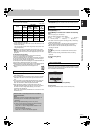
[HDD] [RAM] [-R] [-RW‹V›] [+R]
When an external equipment (e.g., a digital/satellite receiver) with a
timer function is connected to the AV2 terminal of this unit by a
21-pin Scart cable (➡ 17), it is possible to control the recording of
the unit with the equipment.
Preparation
≥Change the “AV2 Input” (➡ 57) in the SETUP menu to match the
connected equipment .
≥Change the “Ext Link” in the SETUP menu to match the connected
equipment (➡ 57).
Ext Link 1: The start and stop time of the recording are controlled
by the signal received from the digital/satellite receiver.
Ext Link 2: As long as a video picture is being transmitted by the
external equipment, the unit will record it.
1 Make timer programming on the external
equipment.
2 Press [HDD] or [DVD] to select the recording
drive.
If you selected the DVD drive, insert a disc (➡ 22).
3 Press [EXT LINK].
The unit turns off and “EXT Link” lights on the unit’s display to
indicate timer recording standby has been activated.
To cancel the external control
Press [EXT LINK] to stop recording or to cancel linked timer
recording standby.
≥In order to prevent accidental operation, press [EXT LINK] to
cancel the setting after recording is finished.
[Note]
≥This function does not work with some equipment. Refer to the
equipment’s operating instructions.
≥The beginnings of recordings may not be recorded correctly in
some cases.
≥When “Ext Link” is set to “Ext Link 2”, this function does not work if
the input signal is NTSC system.
≥When “AV2 Connection” is set to “Decoder”, EXT LINK is not
available (➡ 57).
≥Programmes are recorded as one title on this unit when the end
time of the earlier timer recording and the start time of the later
timer recording are close to each other. To divide the titles, go to
“Divide Title” (➡ 39).
≥When this unit is in EXT LINK standby (“EXT Link” is shown on the
unit’s display), The GUIDE Plus+ data cannot downloaded.
≥While the unit is in EXT LINK standby mode or recording, video
picture is from the AV2 input terminal irrespective of “AV1 Output”
setting (➡ 57).
≥During EXT LINK standby mode or recording, playback is only
available from the drive performing the recording.
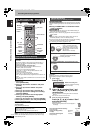
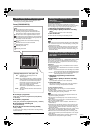
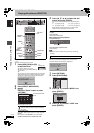
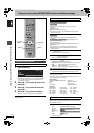
Check, change or delete a programme
TIMER
RECORDING
1:58 SP
DVD
30:24 SP
HDDRemain
12:56:00 15. 7. TUE
RETURN
ENTER
Press ENTER to store new programme.
Mode
StopStart
No.
Date
VPS
PDC
HDD
DVD
Name
Disc
space
New Timer Programme
Icons
[ This programme is currently recording.
W The times overlap those in another programme.
Recording of the programme with the later start time
starts when the earlier programme finishes recording.
F The disc was full so the programme failed to record.
The material was copy-protected so it was not recorded.
X The programme did not complete recording because the
disc is dirty or some other reason.
Timer programmes set to Auto Renewal Recording
(➡ 28).
Titles that have been rerouted to the HDD
(Displayed while recording.)
Recording drive: HDD
Recording drive: DVD
Message displayed in the “Disc space” line
OK: Displayed if the recording can fit in the
remaining space.
> (Date): For recordings made daily or weekly, the display
will show until when recordings can be made (up
to a maximum of one month from the present
time) based on the time remaining on the disc.
! : It may not be possible to record because:
≥there is not enough space left
≥the number of possible titles has reached its
maximum.
Relief: Timer programmes that will be relief recorded to
the HDD.
Making timer recordings on the
television
(e.g., of digital broadcasts)
Linked timer recordings with external
equipment (digital/satellite receiver) —
EXT LINK
Timer recording
29
EH60.book Page 29 Monday, June 27, 2005 8:46 PM