


English
INSTALLATION 17
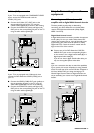
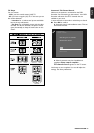
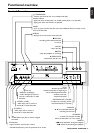
Step 5: Connections - Front of
your DVD Recorder (optional)
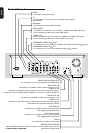
Camcorder connection
l If you have a DV or Digital 8 camcorder, connect
the DVD Recorder’s i-link DV input jack on the
Recorder (1) to the corresponding output jack on
the camcorder using the i-link cable of your
camcorder.
l If you have a Hi-8 or S-VHS(C) camcorder, connect
the DVD Recorder’s S-VIDEO IN jacks on the DVD
Recorder to the corresponding OUT jacks on the
camcorder. Use the S-Video cable supplied (2).Then
connect the AUDIO Left (white) and Right (red) IN
jacks of the DVD Recorder to the corresponding
OUT jacks on the camcorder using the AUDIO
cable supplied (4).
l Otherwise, connect the VIDEO IN jacks on the
DVD Recorder (yellow) to the corresponding OUT
jacks on the camcorder. Use the video cable
supplied (3). Then connect the AUDIO Left (white)
and Right (red) IN jacks of the DVD Recorder to
the corresponding OUT jacks on the camcorder
using the AUDIO cable supplied (4).
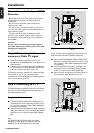
Step 6: Power supply
l Make sure all necessary connections are made
before connecting the DVD Recorder to the power
supply.
l Plug the supplied power cable into the Power jack
on the back of the Recorder.
l Connect the power card to an AC outlet.
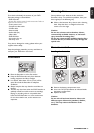
Note:
Make sure the local power voltage matches the required
110V.
When the Recorder is in the ‘standby/power off’ position, it is
still consuming some power.
If you wish to disconnect your DVD Recorder completely from
power, remove the power cord from the AC Outlet.
When the DVD Recorder is disconnected from the power, TV
channels and timer data usually will be stored one year.
PANEL
43
21
Camcorder
Camcorder