


EditingMasteringUsing USBConvenient
Functions
Appendixes Quick StartGetting Ready
to Record
Recording/
Playback
Using
Effects
Using
Rhythm
47
Re-Recording Only Over a Mistake (Punch-In/Out)
4
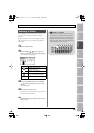
Use the CURSOR [ ] [ ] buttons to move the
cursor to “DISP,” and turn the dial to choose the units
in which you’ll specify the locations.
5
Use the CURSOR [ ] [ ] buttons to move the
cursor to “IN,” and turn the dial to specify the punch-
in location.
6
Use the CURSOR [ ] [ ] buttons to move the
cursor to “OUT,” and turn the dial to specify the
punch-out location.
7
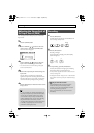
Press the [EXIT] button a number of times to return to
the play screen.
The display will indicate “A. PUNCH,” indicating that
the punch-in/out locations have been specified.
■
Recording
In this example, we’ll explain how to specify the auto
punch-in/out locations beforehand, and then re-record a
specified region of the previously recorded track 1.
1
Press the track 1 [REC] button.
The track 1 [REC] button will light.
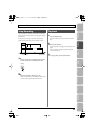
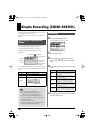
2
Set the track [1] fader to the position shown in the
illustration.
fig.Panchin01.eps
3
Play back the song, and use the [REC LEVEL] knob to
adjust the volume of the input source.
While listening to compare the track to be re-recorded
with the input source, use the [REC LEVEL] knob to
adjust the input source so that there is no difference in
volume.
4
Move to a location earlier than where you want to
start re-recording.
5
Press the [REC] button to enter recording-standby
mode, and then press the [PLAY] button.
Punch-in will automatically occur at the location you
specified; re-record your performance.
Playback will automatically resume at the punch-out
location you specified.
6
When you’ve finished recording, press the [STOP]
button to stop.
* While the data is being updated, the display will indicate
“Keep power on!” Do not turn off the power while this
message is shown.
7
Listen to the re-recorded result.
Return to a point earlier than where you began re-
recording, and play back.
Use the track [1] fader to adjust the volume of track 1.
Setting
Explanation
TIME
Specify the locations in units of time.
MEASURE
Specify the locations in units of mea-
sures.
After specifying the time in the procedure above, a
“+” may appear to show that there is a discrepancy
between the actual current position and the position
displayed.
If you specify the locations using measures, specify
the locations at each screen using the dial to
eliminate the discrepancy.
You can move to the current location by pressing
the [ENTER] button.
BR800_e.book 47ページ 2010年3月2日 火曜日 午後6時40分