


-38
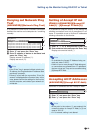
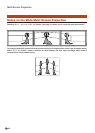
Multi Screen Projection
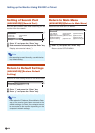
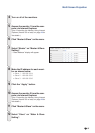
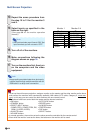
Master
Set Inputs
ON
ON
OFF
OFF
OFF
ON
ON
OFF
OFF
OFF
OFF
ON
COMPUTER 1
COMPUTER 2
DVI
HDMI
VIDEO
S-VIDEO
Slave
Set Inputs
COMPUTER 1
COMPUTER 2
DVI
HDMI
VIDEO
S-VIDEO
Monitor 1 Monitor 2-4
13
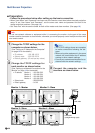
Repeat the same procedure from
the step 10 to 12 for the monitor 3
and 4.
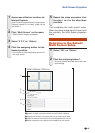
14
Select inputs as specified in the
table on the right.
(See page 36 on the monitor operation
manual.)
Note
•Set input terminals you will use to “ON”. Set
input terminals you will not use to “OFF”.
15
Turn off all of the monitors.
16
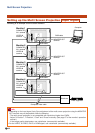
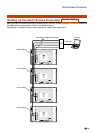
Make connections following the
diagram shown on page 35.
17
Turn on the monitors first, then turn
on the computers and the video
equipment.
Note
•Image quality may deteriorate when picture sig-
nals are input through multiple monitors with an
RGB cable in a daisy chain connection.
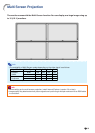
Info
•To set up the multi screen projection, assign a monitor as the master and the other monitor as the slave
and connect the monitors with commercially available LAN cables (UTP cable, Category 5, cross-over
type). In this way, you can control the both monitors with one remote control.
•The buttons below can control both the master and the slave at one time.
• ON button • AUTO SYNC button
• STANDBY button • RESIZE button
• DIRECT INPUT buttons • AV MODE button
(COMPUTER1, COMPUTER2, DVI, • FREEZE button
HDMI, S-VIDEO, VIDEO) • P&P button
• AV MUTE button • SELECT button
• VOLUME buttons
•In normal operation, the monitor set as the slave cannot be controlled by the remote control.
•Even while the monitor is set as the slave, the buttons on the monitor can be used.