


76
LZ196 (E/F) Web 213:276
Chapter 7: Using the THINC
™
home network feature
Setting up e-mail scheduling
1
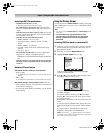
Press Y and open the Setup menu.
2 Highlight Installation and press T. The Installation
menu appears.
3 Open the Network menu.
4 Highlight E-mail Scheduling Setup and press T. The
E-mail Scheduling Setup window opens.
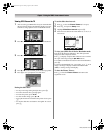
5 Enter the required data in the fields.
See “Description of fields in the E-mail Scheduling Setup
window” (- page 77) for details on the settings for these
fields.
• For the fields listed below, press B or b to highlight the
field, and then press C or c to select the settings:
– E-mail Scheduling: On or Off
– Check for New Mail: Options are 5 min,
15 min, 30 min and 1 hour.
– ID Required: Yes or No
• For the fields listed below, press B or b to highlight the
field, press T to open the software keyboard window
for the selected field, and then enter the required
information using the software keyboard:
–ID
– Authorized E-mail
See “Using the software keyboard” (- page 67) for
instructions on entering data in the fields using the
software keyboard.
6 Highlight E-mail Account Setup, then press T. The
E-mail Account Setup window will appear.
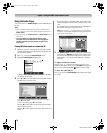
7 Enter the data in the fields as you did in step 5. See
“Description of fields in the E-mail Account Setup
window” (- page 78) for details on the settings for these
fields.
Press B or b to highlight the field, press T to open the
software keyboard window for the selected field, and then
enter the required information using the software
keyboard:
– E-mail Address
– POP3 Server Address
– POP3 Port Number
– POP3 User Name
– POP3 Password
– SMTP Server Address
– SMTP Port Number
– SMTP Authentication
– SMTP User Name
– SMTP Password
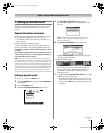
8 When you are finished entering all characters for the
selected field, highlight Test and press T to test the
e-mail setup.
During testing, the TV will display the E-Mail Account
Test window.
Note: Depending on your configuration, the e-mail test
can take several minutes. Do not press O during this
time.
9 When testing is finished, a message will appear indicating
whether the e-mail test passed or not.
If the e-mail test passes:
The “All tests were successful” message (shown below)
will appear.
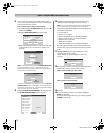
Done
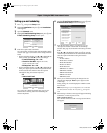
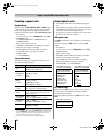
E-mail Scheduling Setup
Check for New Mail
Cancel
Every 5 minutes
Yes
ID Required
ID
E-mail Account Setup
Authorized E-mail
E-mail Scheduling
On
Display Name
Check for New Mail
ID
Authorized E-mail
Every 5 minutes
DoneCancel
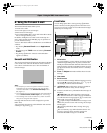
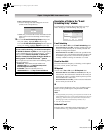
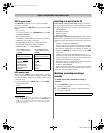
E-mail Account Setup
1
4
7
100
Backspace
1 a b c 2 A B C
j k l 5 J K L
t u v 8 T U V
p q r s 7 P Q R S
0
g h i 4 G H I
w x y z 9 W X Y Z
m n o 6 M N O
_
2
5
8
3
6
9
d e f 3 D E F
0
Cancel
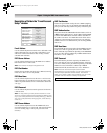
E-mail Account Setup
E-mail Address
POP3 Server Address
POP3 Port Number
POP3 User Name
SMTP Password
Test Done
POP3 Password
SMTP Server Address
SMTP Port Number
SMTP Authentication
Not required
SMTP User Name
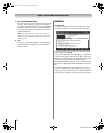
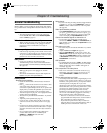
E-Mail Account Test
All tests were successful.
OK
LZ196_EN.book Page 76 Tuesday, August 1, 2006 6:04 PM