


Toshiba 42/46XV550A
20
Using the TV’s features (General)
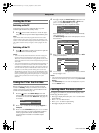
Activating Auto Contrast
When Auto Contrast is activated, it will automatically
optimize the backlighting levels to suit ambient light
conditions.
1 From the PICTURE menu, press V or U to select Auto
Contrast.
2 Press Y or Z to select On or Off.
Setting x.v.Colour Selection
The colour range of x.v.Colour (- page 35) is an international
standard and enables a wider colour range than conventional
video applications. If the x.v.Colour Selection is set to
Auto, your TV will automatically detect images supporting
x.v.Colour.
1 From the PICTURE menu, press V or U to select
x.v.Colour Selection.
2 Press Y or Z to select Auto, On or Off.
Note:
If a non-HDMI input is selected or the x.v.Colour setting in the
HDMI Settings menu is set to Off, this function is not available.
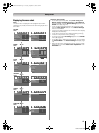
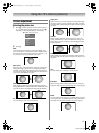
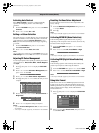
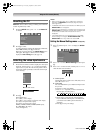
Adjusting 3D Colour Management
You can adjust picture colour quality by selecting from 6 base
colour adjustments : Red, Green, Blue, Yellow, Magenta
and Cyan.
1 Press M, then press Y or Z to display the PICTURE
menu.
2 Press V or U to select 3D Colour Management, then
press Y or Z to select On.
3 Press V or U to select Base Colour Adjustment.
4 Press Q, then press V or U to select the item you want
to adjust.
5 Press Z, then press Y or Z to select Hue, Saturation or
Brightness.
6 Press V or U to adjust the settings as required.
Notes:
• If you set 3D Colour Management to Off, this feature will not
be available.
• In PC input mode (- page 24), this feature is not available.
Resetting the Base Colour Adjustment
The reset function returns the base colour adjustment to the
factory settings.
1 From the Base Colour Adjustment menu, press V or
U to select Reset.
2 Press Q.
Note:
In PC input mode (- page 24), this function is not available.
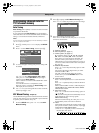
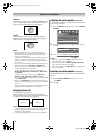
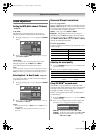
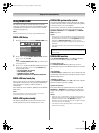
Activating MPEG NR (Noise Reduction)
If the incoming MPEG signal exhibits noise (is grainy),
depending on the compression and conversion, the noise may
be reduced when using this function.
1 From the PICTURE menu, press V or U to select
MPEG NR.
2 Press Y or Z to select Off, Low, Middle or High.
Note:
In PC input mode (- page 24), this feature is not available.
Activating DNR (Digital Noise Reduction)
- analogue only -
If the incoming signal is weak and the picture is blurry, the
picture may be improved when using this function.
1 From the PICTURE menu , press V or U to select DNR.
2 Press Y or Z to select Auto, Off, Low, Middle or High.
Note:
In PC input mode (- page 24), this function is not available.
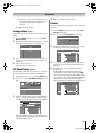
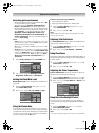
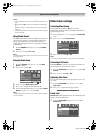
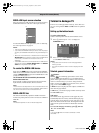
Using Auto Format
When the TV receives a true HDMI signal picture and Auto
Format is On, the picture will automatically be displayed in
HDMI signal format, irrespective of the TV’s previous setting.
When in Digital TV, the display format will follow the
broadcasted format.
1 Press M, then press Y or Z to display the FUNCTION
menu.
2 Press V or U to select Auto Format, then press Y or Z
to select On or Off.
3D Colour Management
On
Hue Saturation
Reset
Brightness
0Red
Green
Blue
Yellow
Magenta
Cyan
00
000
000
000
000
000
Base Colour Adjustment
Hue Saturation Brightness
0Red 0 0
MPEG NR
Low
DNR
High
FUNCTION
Teletext
Auto Format
Panel Lock
4:3 Stretch
Blue Screen
Side Panel
Auto
1
Off
Off
On
On
Asia_4246XV550A.book Page 20 Tuesday, September 16, 2008 3:03 PM