


26
Operation with tape (Continued)
One-touch Timer Recording
With this feature you can record for a preset length
without using the program timer.
1. Turn on DVD+VCR and the TV.
2. Be sure the TV is tuned to the DVD+VCR output
channel (CH 3 or 4). If a direct VIDEO/AUDIO con-
nection is made between the DVD+VCR and the TV,
set the TV’s source selector to VIDEO.
3. Insert a video cassette with the safety tab intact.
4. Select the desired channel using CH/TRK (v/V) or
the number buttons (0-9). The channel number
appears on the TV screen. If you are recording from
another source via audio/video input jacks, select
LINE1 (rear jacks) or LINE2 (front jacks) by using
INPUT SELECT.
5. Set the desired recording speed (SP or SLP) using
SP/SLP. The tape speed appears on the TV screen.
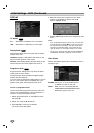
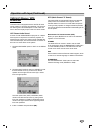
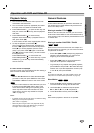
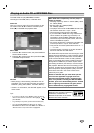
6. Press REC/OTR twice. The menu appears on the
TV screen, recording starts, and the (TIMER)
indicator lights.
7. Press REC/OTR repeatedly to select the recording
time length. Each time you press this button the
recording time increases 30 minutes (up to 9 hours).
At the end of the recording, the DVD+VCR will stop
recording and shut off.
If you set the time to 0H00M, the DVD+VCR goes
into the normal recording mode. Press STOP (x) to
stop the recording.
Note:
• During One-touch Timer Recording, you cannot change the
channel on the DVD+VCR.
• During the VCR recording mode, you cannot change to the
DVD mode.
• The unauthorized recording, use, distribution, or revision of
television programs, videotapes, DVDs and other materi-
als, is prohibited under the Copyright Laws of the United
States and other countries, and may subject you to civil
and/or criminal liability.
Checking the Recording Time
Press REC/OTR once to check the recording time. The
recalled setting automatically returns to the TV screen
after 6 seconds.
Extending the Recording Time
The recording time can be extended anytime by press-
ing REC/OTR. Subsequent presses result in advancing
the recording time by 30-minute increments.
Note:
If you press PAUSE/STEP (X/C) during instant timer record-
ing, the instant timer recording is cancelled.
Recording from External Components
You can record from an external component, such as a
camcorder or VCR, connected to any of the
DVD+VCR’s external inputs.
1. Make sure that the component you want to record
from is connected properly to the DVD+VCR. See
page 14.
2. Press INPUT SELECT repeatedly to select the
external input to record from.
• LINE1 (L1): Audio/Video Input mounted on back
panel.
• LINE2 (L2): Audio/Video Input mounted on front
panel.
3. Load a recordable tape.
4. Set a recording mode (SP or SLP) as necessary by
pressing SP/SLP repeatedly.
5. Play the tape or disc in the external component. If
you have a TV attached to your DVD+VCR, you
can see the video playing.
6. Press REC/OTR once to start recording.
The REC indicator lights in the display window.
7. Press STOP (x) to stop recording.
Notes:
• Before recording, confirm the recording start position.
• If your source is copy-protected using CopyGuard, you will
not be able to record it using this unit. See Copyright on
page 7 for more details.
•To record for a fixed length of time, see One-touch Timer
Recording.
ONE TOUCH TIMER RECORD
CHANNEL 7
SPEED SP
START NOW
LENGTH 0H30M