


Recording Mode
21
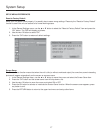
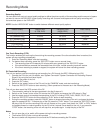
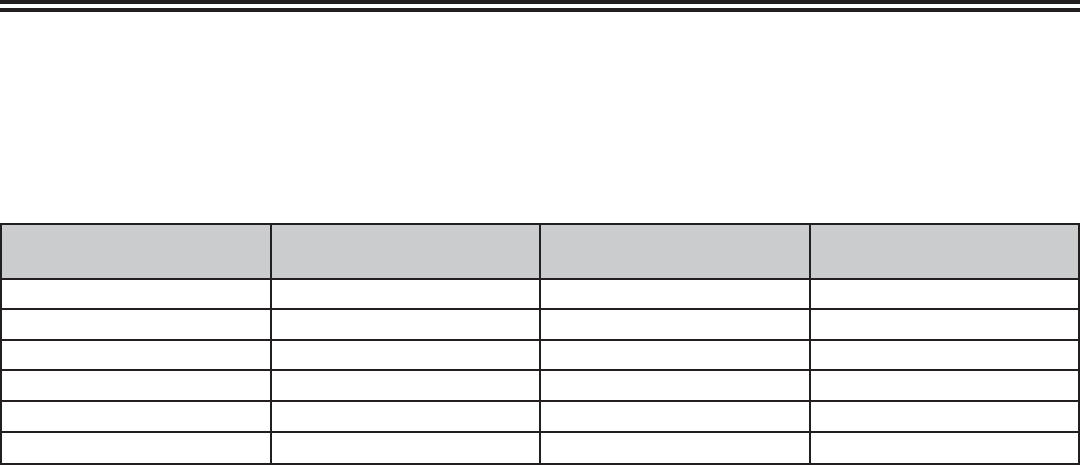
Recording Quality:
You can select from up to six record quality settings to defi ne the picture quality of the recordings and the amount of space
you want to use on the DVD/HDD. Higher quality recordings will consume more space and low quality recordings will
consume less space on the DVD/HDD.
NOTE: Use the “ADD/CLEAR” button to switch between different record quality options.
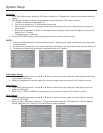
Record Quality Record Time
(4.7GB, DVD)
Recording Time
(80GB, HDD)
Video Quality
HQ (High Quality) 1 hour 17 hours Best
SP (Standard Play) 2 hours 34 hours Very good
SP+ (Standard Play) 2.5 hours 42 hours Good
EP (Extended Play) 3 hours 51 hours Normal
LP (Long Play) 4 hours 68 hours Moderate
SLP (Super Long Play) 6 hours 102 hours Low
One Touch Recording (OTR):
This function enables you to set up the timer during the recording process. Once the scheduled time is reached, the
system will stop recording automatically.
1. Enter the “Recording Mode” and start recording.
2. For desired timer recording, press the “REC/OTR” button once or several times.
• The recording time will increase by 30 minutes with every pressing of the “REC/OTR” button.
• If the scheduled time exceeds the recordable time of the disc, normal recording mode will restore.
• If the timer recording is paused or stopped, the system will cancel the timer recording process.
DV Controlled Recording:
This unit can perform real-time monitoring and recording for a DV through the IEEE 1394 serial port (DV).
1. Connect the DV to the unit (for details, see “System Connection: System Connection for Recording External
Signals”) by using the front panel inputs.
2. Switch on the power of the unit.
3. Press the “DV” button.
4. Switch on the “power” button of the DV, set it to the “CAMERA” mode, and start monitoring.
5. Press the “REC/OTR” button to start recording. (Other operations is the same as in the Recording Mode)
This unit can also record the VCR content of the DV.
1. The connection method is the same as stated in the fi rst 3 steps of 1.
2. Switch on the “Power” button of the DV to enter the VCR status, and ensure the VCR status is “Stop”
3. Use the remote control to complete the operations of the DV, including STOP, PLAY, PAUSE, FB, FF, etc.
4. Press the “REC/OTR” button and then press the “PLAY” button to start recording.
5. During the recording process, press the “PAUSE” button to suspend recording of the unit, and press the button
again to suspend the DV. To restore play of the DV, press the “PLAY” button; if you press the “REC/OTR” button,
the play of the DV and the recording of the unit will resume at the same time; press the “FWD” or “REV” buttons
to complete forward or rewind operation for the DV, while it reports Pause status to the unit; if you press the
“STOP” button, the recording of the unit will stop fi rst, and press again to stop the play of the DV.
Notes:
• Do not move the unit or switch off the power during the recording process.
• The fi nalized DVD+R disc could not be recorded.
• Be sure to switch off the power of the unit and the DV before connecting the DV cables.