


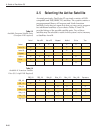

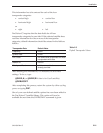


2.6 Setting the Skew Angle
(European Systems Only)
The Antenna LNB skew angle must be adjusted to optimize
channel reception. Refer to your satellite service provider for the
proper skew angle for the selected satellite service and
geographical location. The skew angle for KVH predefined
satellites can also be obtained by using a PC connected to the
maintenance port. Enter your latitude and longitude using the
GPS command (refer to Appendix E.6 for details) and then type
SKEWANGLE. The system will respond with the skew angle for
whichever satellite is currently selected.
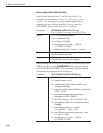
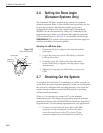
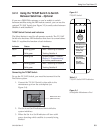
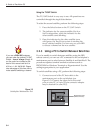
Adjusting the LNB Skew Angle
1. Determine the skew angle for the selected satellite
and region.
2. Loosen the wing nut on the LNB clamp so that the
LNB can be moved.
3. Carefully rotate the LNB so that the scribe mark
on the LNB clamp is aligned with the proper angle
measurement.
4. Tighten the wing nut and LNB clamp to secure the
LNB.
2.7 Checking Out the System
To complete the TracVision C3 installation, it will be necessary to
verify that the system functions properly. Critical to ensuring that
the system is configured and operating properly is to check the
system startup routine to ensure that the system is operating
within normal parameters.
To do so, it is necessary to connect a PC to the terminal
maintenance port. The diagnostics procedure requires terminal
emulation software such as PROCOMM or Windows Terminal or
Hyperterminal. Use the settings appropriate to your application.
1. Connect one end of the PC data cable to the DB9
connector on the switchplate. Connect the other
end to the serial port on the PC (a 9-pin/25-pin
connector adapter may be needed for some PCs).
2-24
A Guide to TracVision C3
Skew Angles
LNB Clamp
& Wing Nut
Scribe
Mark
LNB
Figure 2-20
Skew Adjustment