


10
AXIS 243Q Blade - Accessing the video server
Setting the root password
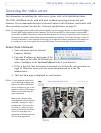
When accessing the camera for the first time, the
Configure Root Password dialog is displayed on the
screen.
1. Enter a password and re-enter to confirm
the spelli
ng. Click OK.
Note:
Before you enter your password at this point, you can secure
configuration of the root password via HTTPS by creating a
self-signed certificate. To do so, click the Create self-signed
certificate... button in the Create Certificate window, and
then proceed as follows.
2. The Enter Network Password dialog
appears. Enter the User name: root
Note: The default administrator user name root is permanent and cannot be deleted or altered.
3. Enter the password as set in step 2 above, and click OK. If the password is lost, the
camera must be reset to the factory default settings. See “Resetting to the factory
default settings”.
If required, click Yes to install the AXIS Media
Control (AMC). You will need administrator
rights on the computer to do this.
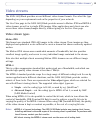
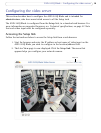
The Live View page
If your AXIS 243Q Blade has been customized to meet specific requirements, the buttons
and other items described below may or may not be displayed on the Live View page. The
following provides an overview of each available button:
The Video Format drop-down list allows the
video format on the Live
View page to be temporarily changed.
The Output buttons, Pu
lse and Active/Inactive below, control the output directly from
the Live View page. These buttons are configured under Setup > Live View Config >
Layout.
Pulse -
click this button to activate the port for a defined period of time, e.g.
to switch on a light for 20 seconds.
Active/Inactive - click these buttons to
manually start and stop a connected
device, such as to switch a light on/off.
The trigger buttons trigger an event directly from the Live
View page. These
buttons are configured under Setup > Li
ve View Config > Layout. Click
these buttons to manually start and stop events.