


HUGHES-BRAND DIRECTV SYSTEM OWNER’S MANUAL
PAGE 4-18
The “box” method begins by subtracting 10 degrees from the azimuth and subtracting 4 degrees
from the elevation values that you determined earlier.
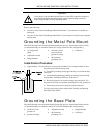
We’ll begin by adjusting the elevation. First, loosen the nuts securing the two (one on each side)
elevation bolts just enough so that you can easily tilt the reflector up and down. Next, line up the
elevation indicator with the tick mark corresponding to the elevation calculated earlier (result
minus 4 degrees). This mark may appear as a pointer or as a painted edge. Do not use the
bolt or nut as a point of reference. Finish adjusting the elevation by lightly tightening the bolts
when the indicator is aligned with the correct tick mark. Make sure that the dish doesn’t slip out of
position while you are tightening the bolts.
Next, we’ll adjust the azimuth. For this part of the procedure, a compass (such as the one included
in the Do-It-Yourself Installation Kit) will make it possible to point in the proper direction. This is
done by first loosening the azimuth bolts just enough in order to turn the antenna smoothly with a
little pressure. Stand behind or beneath the antenna reflector and, while grasping the outer edges of
the reflector, rotate the antenna until it is pointing toward the azimuth value determined earlier
(result minus 10 degrees). Be sure that as you do this you do not lean on the reflector, as that
would affect the alignment. Don’t tighten the bolts just yet!
1) Slowly turn the dish 20 degrees towards and past the actual determined azimuth. It should
take about 20 seconds to make the sweep of the sky.
2) If no signal was found in this pass, increase the elevation by 1 degree and slowly turn the dish
back the other direction. If you do find a signal, go to step 5.
3) If you have done this for 9 passes (now 4 degrees above the determined elevation), start back
at the beginning point and try again. If you cannot achieve any signal after several tries, call
your dealer or the Customer Care Center at 1-800-274-8995.
4) If no signal is found, increase the elevation by 1 more degree and go back to step 1. If you do
find a signal, go to step 5.
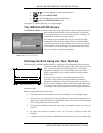
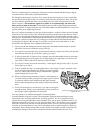
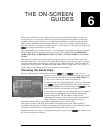
5) To have reached this step it is assumed that there is some degree of signal. A numeric value
for the strength ranges from 0 to 99. While your signal strength
may vary, refer to the following map to determine the suggested
signal strength goal for your area:
6) Gently continue turning the antenna reflector a small amount as
you were turning it when you began receiving a signal. Continue
to adjust the antenna in this fashion until the signal strength
meter reaches the highest possible reading. Tighten the azimuth
bolts.
7) Slowly tilt the antenna up and down to try to improve the signal
strength reading. When you are satisfied that you have achieved
the strongest signal, tighten the elevation bolts.
You may choose to try different transponders. Each transponder
transmits multiple programs at a time. The transponder displayed when entering the screen
represents the one associated with the last viewed program (or “02” if no program has been
viewed). By moving the highlight to the transponder area, you can enter a number from 01 to 32.
Different transponders may show varying signal strengths. This is not indicative of any problem
unless the variations are extreme (such as 40 and 90). In the event of signal reception problems,
customer service representatives may ask for information such as signal strength on a different
transponder. Do not change transponders trying to find the best signal since the transponder will
automatically change to the one that corresponds with the satellite channels that you view.
Typical signal strength results. Your actual signal
strength may vary.