


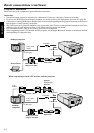
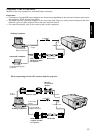
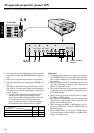

22
ENGLISH
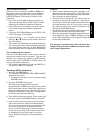
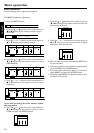
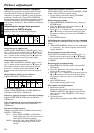
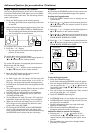
Adjustment from personal computer
Although this projector sets proper signal systems
automatically for the image signal from personal
computers, it cannot be applied to some of personal
computers. In this case, press AUTO POSITION
button. If the images are still not projected correctly,
use MENU display to adjust the projected images
from personal computers. Also available to memorize
the setting.
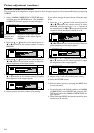
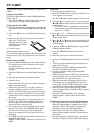
Adjusting the images form personal
computers in MENU display
Adjust as below for the following symptoms.
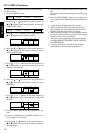
Image moves to right or left :
Adjust HORIZ. POSITION in SIGNAL menu. Press
the º button on the control panel (or } button on
the remote control) to move the image to left. Press
the ª button on the control panel (or { button on
the remote control) to move the image to right.
Image moves to up or down :
Adjust VERT. POSITION in SIGNAL menu. Press
the º button on the control panel (or } button on
the remote control) to move the image to upward.
Press the ª button on the control panel (or {
button on the remote control) to move the image to
down.
Image flickers / Image is out of focus :
Adjust FINE SYNC. in SIGNAL menu.
Wide stripes appear :
Adjust CLAMP POSITION or CLAMP WIDTH of
each menu in SIGNAL - USER menu.
Noise etc. appears on right or left side of image:
Adjust HORIZ. PIXELS of the menu in SIGNAL -
USER menu.
Noise etc. appears on top or bottom part of image :
Adjust VERT. LINES of the menu in SIGNAL -
USER menu.
Top part of image curves :
Change the setting of PLL or HOLD of the menu in
SIGNAL - USER menu.
PLL .......Select FAST, NORMAL, or SLOW for
image which top part is the least curved.
Select AUTO for normal setting.
HOLD ...Select ON, and adjust BEGIN or END
for image which top part is the least
curved.
Image does not move naturally :
Adjust VERT. SYNC. of the menu in SIGNAL - USER
menu. Select AUTO for normal setting.
• Do not change each menu setting in SIGNAL -
USER menu for normal setting.
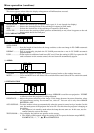
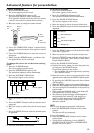
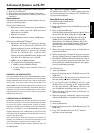
Memorizing the setting
1. Select MEMORIZE in SIGNAL menu, and press
ENTER button.
2. Press the button on the control panel (or %
button on the remote control).
3. Press theª or ºbuttons on the control panel (or
{ or } buttons on the remote control) to select
the memory which you wish to record (USER 1 or
USER 2)
4. Press ENTER button.
Initializing the setting which has been changed
Select DELETE in SIGNAL menu, and press ENTER
button.
• While INITIALIZING, buttons do not work about
2 - 18 seconds. Use them to operate after initial-
izing is finished.
Seeing images in recorded setting.
Select AUTO in SIGNAL menu, and press theª or
ºbuttons on the control panel (or { or } buttons
on the remote control) to select the memory (USER1
or USER2).
Resetting the recorded setting
1. Select RESET in SIGNAL menu, and press EN-
TER button.
2. Press the button on the control panel (or %
button on the remote control).
3. Press theª or º buttons on the control panel (or
{ or } buttons on the remote control) to select
the memory which you wish to reset (USER 1 or
USER 2).
4. Press ENTER button
The recorded setting will be reset.
The simple way of adjustment
1. Horizontal position:
Adjust the start position (the left end) using
HORIZ. POSITION, and adjust the end position
(the right end) using TRACKING. Then repeat
these steps.
2. Vertical position:
Adjust the start position using VERT. POSITION.
AUTO
AUTO
USER1
USER2
SXGA70a
0 0 0
RGB
Y,C
B
,C
R
USER
HORIZ.
POSITION
VERT.
POSITION
FINE SYNC. TRACKING
RGB/Y,C
B
,C
R
0
MEMORIZE
DELETE
RESET
OPTION Ver.INSTALLATIONAUDIO
PC CARD
AUTO PLAY
PinP/
EXPAND
PICTURESIGNAL
Picture adjustment
33 33
33
3333 3333
AUTO AUTO
ON
OFF
AUTO
BEGIN
CLAMP
POSITION
CLAMP
WIDTH
HORIZ.
PIXELS
VERT.
LINES
VERT.
SYNC.
SIGNAL - USER
PLL HOLD
33
END
ON
OFF
FAST
NORMAL
SLOW