


40
ENGLISH
The light source lamp is designed to project the image
on the LCD panel. When the light source lamp no longer
functions, replace it with a new one to ensure optimum
performance.
Caution:
• Do not remove the light source lamp from inside of
this equipment immediately after using the projec-
tor, you may get burned because of the high tem-
perature of the light source lamp.
• When you replace the light source lamp, press the
power button to power off, then wait for 120 sec-
onds in stand-by mode to cool down the lamp and
LCD panels. Turn off the main switch, unplug the
power code from the outlet and wait one hour so
that the lamp is cool to the touch.
• Do not remove the light source lamp except for re-
placement. Careless treatment can cause injury or
fire.
• Do not touch the lamp directly. It may be broken
and may cause you to injure or burn yourself.
• Be sure not to drop the lamp lid screw into the pro-
jector. Also be sure also not to insert metal or any
flammable objects, it may cause fire or an electric
shock. If any objects are inserted, please unplug and
contact your dealer.
• Install the lamp securely, failure to do so it may
cause a fire.
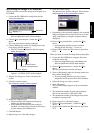
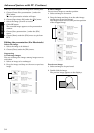
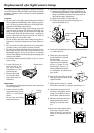
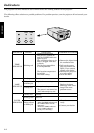
1. Loosen the screw of
the lamp lid on the
top cover using a
screwdriver (+) , and
remove the lid.
• Remove the lamp
cover in the direc-
tion of the arrow as
indicated.
Important:
Be careful not to damage the electric wire connected
to this equipment.
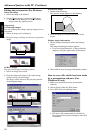
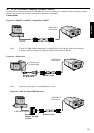
2. Loosen a screw (a) of fix-
ing metal using a screw-
driver (+), and remove
them.
Do not lose the fixing
metal and screws.
Replacement of a light source lamp
(a)
(e)
Fixing
metal
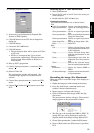
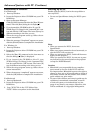
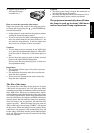
3. Set Lamp exchanging metal into the projector.
1) Insert metal fittings for lamp replacement in
the following positions: on the front face of the
lamp (2 positions), between the lamp, and on
the bottom edges (4 positions).
2) Align screw holes (c) with node (d).
3) Fasten the piece into place using the two
screws included (b, b’).
Lamp exchange
metal
Hooks
(x 6)
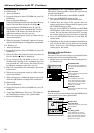
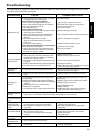
4. Loosen the lamp fixing screw (e) using a screwdriver
(+), and remove it.
5. Hold onto the projector
by the handle as you pull
out the lamp.
For the lamp you have
removed, do not spill liq-
uid on it, place it near
flammable objects or
where children can touch
it. Otherwise, it will cause in-
jury or fire.
6. Insert the new lamp securely
into the projector body in the
right direction.
7. Tight up the screws (e) which
have been removed in 4 using a screwdriver (+).
8. Loosen the two screws (f), (f')
of lamp exchanging metal
using a screwdriver, and re-
move them with the metal.
9. Remove the holes from the
lamp replacement metal
fittings (c) from the node
(d).
10.
Insert the fixed metal pieces
from step 2 into the screw
holes (f) and (f’), and use one
screw (a) to hold the piece in
place.
Lamp
Handle
(f')
(f)
(e)
(a)
Loosen here
(c)
(b')
(b)
(d)
(e)