


EPHD04+ HDcctv DVR
11
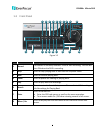
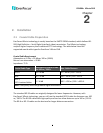
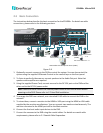
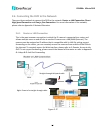
2.3 Basic Connection
The instructions below describe the basic connection for the EPHD04+. For details on cable
connections, please refer to the following sections.
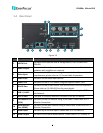
Mouse
Line Level Audio Out
DC 12V
Line Level Audio In 1 ~ 4
WAN
PowerVideo Plus Multiple Site Client (LAN2)
1
2
3 4
Call Monitor
(VGA)
5
6
7
Front View Rear View
HDcctv Camera
1 ~ 4
Main Monitor
(HDMI)
Web Remote
Client (LAN1)
Figure 2-8
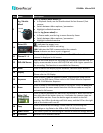
1. Optionally connect a mouse to the DVR to control the system. You can also control the
system using the supplied IR Remote Control or the control keys on the front panel.
2. To listen to audio of video source, connect speakers to the Audio Out port. Note that
speakers with amplifier are required.
3. Using the supplied Power Cord, connect one end to the DC 12V port on the DVR and the
other end to the DC 12V power outlet.
Note: Please ensure to connect the internal power cables to the internal HDDs before
powering on the DVR. Please refer to 2.2 Hard Disk Installation.
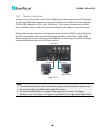
4. To manage the DVR over network, use a standard RJ-45 cable to connect the DVR to the
network.
5. To view videos, connect a monitor to the HDMI or VGA port using the HDMI or VGA cable
supplied by the monitor manufacturer. You can connect two monitors simultaneously. The
monitor connected to the HDMI port will be the Main monitor.
6. Connect the line level audio input devices to the DVR.
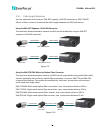
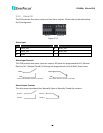
7. Connect the cameras to the DVR using the coaxial cables. For details on coaxial cable
requirements, please refer to 2.1 Coaxial Cable Preparation.