


2-5MLC 52 Series MediaLink Controllers • Installation
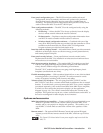
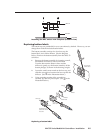
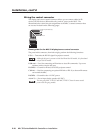
Faceplate
Standoff
MLC 52
Installing the MLC onto a new faceplate (bottom view)
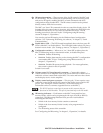
Replacing button labels
The button caps are prelabeled for your convenience by default. However, you can
change them with the included button labels.
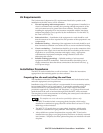
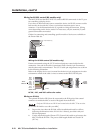
The button assembly consists of a clear lens cap, the
button label, and a white diffuser. (See the diagram
below.) Remove the button assembly from the MLC 52
as follows:
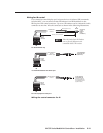
1. Remove the button assembly by inserting a small,
flat-bladed screwdriver, such as an Extron
Tweeker, between the button’s base and the
diffuser to gently pry the button assembly off the
button plunger, as shown in the drawing at right.
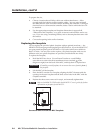
2. Locate the small corner notch on the lens cap, and
slide the screwdriver between the lens cap and the
diffuser. (See
b
in the illustration below.)
3. Using a rotating motion of the screwdriver,
carefully pry the two pieces apart. (See
c
in the
illustration below.)
2
3
TEXT
Separate the two-
piece button here at
the corner.
Pry the two
pieces apart.
Diffuser
Plunger
Base
Button Label
Clear Lens
Notch
Replacing a button label
Pry the button
from the base.