


9
NS-DVDR1 DVD Recorder
www.insignia-products.com
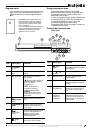
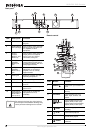
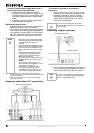
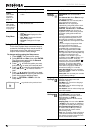
Connecting your recorder to a TV
Make one of the following connections,
depending on the capabilities of your TV.
RF coaxial connection
To connect to your TV with an RF coaxial cable:
• Connect the RF OUT jack on the recorder to
the antenna in jack on the TV using the
supplied 75-ohm Coaxial Cable.
Video connection
To connect to your TV with a video cable:
• Connect the VIDEO OUT jack on the
recorder to the VIDEO IN jack on the TV
using the video cable supplied.
S-Video connection
To connect to your TV with an S-Video cable:
• Connect the S-VIDEO OUT jack on the
recorder to the S-VIDEO IN jack on the TV
using an optional S-Video cable.
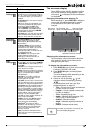
Component video/progressive scan connection
If your television is a high-definition or “digital
ready” television, you can take advantage of the
recorder’s progressive scan output for the
highest quality video possible.
To connect to your TV with a component video
cable:
• Connect the COMPONENT/PROGRESSIVE
SCAN VIDEO OUT jacks on the recorder to
the corresponding in jacks on the TV using
an optional Y Pb Pr cable.
Audio connection
To connect to your TV with audio source:
• Connect the Left and Right AUDIO OUT
jacks on the recorder to the audio left and
right in jacks on the TV using the supplied
audio cables.
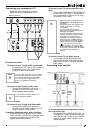
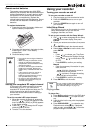
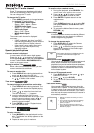
Connecting to an amplifier
To connect two-channel analog stereo or Dolby
Pro Logic II/Pro Logic:
• Connect the Left and Right AUDIO OUT (or
AV AUDIO OUT) jacks on the recorder to the
audio left and right in jacks on your amplifier,
receiver, or stereo system using the audio
cables supplied.
Note
If you use this connection, you must set the
recorder’s RF output channel, then set the
TV to receive this channel. See “Setting
your recorder’s RF output channel” on
page 11 for additional information.
Note
If you use this connection, set the TV’s
source selector to VIDEO.
L
R
AUDIO INPUT
VIDEO
INPUT
Pr
Pb
Y
COMPONENT VIDEO INPUT
S-VIDEO
INPUT
ANTENNA
INPUT
S-Video
cable
Audio
cable
Y Pb Pr cable
RF
cable
Video
cable
Back of recorder
Back of television
Audio
cable
Note
• Set the resolution to 480p using the
PROGRESSIVE SCAN button on the
front panel.
• Progressive Scan does not work with
the RF, Audio/Video, or S-Video
connections.
• If your TV does not accept the
Progressive Scan format, the picture
will appear scrambled.
• Once the setting for progressive scan
output is entered, an image will only
be visible on a progressive scan
compatible TV or monitor. If you set
progressive scan to ON by mistake,
you must reset the recorder. To do this,
remove the disc, then press STOP
( ) and hold it for five seconds
before releasing it. The video output
will be restored to the standard setting,
and a picture will once again be visible
on a conventional analog TV or
monitor.
Digital
coaxial
cable
Digital
optical
cable
Audio
cable