


36
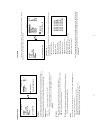
SELECT: Duplicate a particular recorded video from HD1 to HD2.
z Stay on the DISK SETTING page.
z Use the “
^” and “v” buttons, and , to highlight BACKUP, select SELECT and
then press the Enter button
to list all the recorded video.
z Press the “
^” and “v” buttons, and , to select the desired clip and press the
Search button
to mark it.
z After completing the selection, press the Enter button
to proceed.
NOTE: If the capacity of HD 2 is not sufficient to store all selected video, a warning message
“HD2 SPACE NOT ENOUGH” will be displayed on the screen. Please, insert a larger
capacity of hard-disk drive and start the process all over again.
NOTE: The black back will remain (1/7 of screen from the bottom) after executing HD BACKUP.
In such a case, it will disappear by opening the Search menu or starting playing back
movies. This is not a defect.
* About the location of the buttons, please refer to Page 10 2.1 Front View.
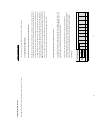
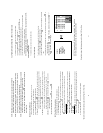
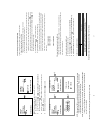
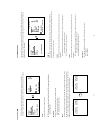
MAIN MENU
RECORD
ALARM
CLOCK / TIMER
COMMUNICATION
DISK
SYSTEM
GO
T
O
DI
S
K PA
G
E
DISK SETTING
REFORMAT
HD2 USAGE
BACKUP----------------FULL
ALARM
SELECT
MAIN PAGE
BACKUP ALARM TO HD2
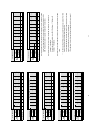
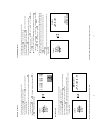
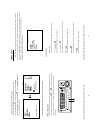
MAIN MENU
RECORD
ALARM
CLOCK / TIMER
COMMUNICATION
DISK
SYSTEM
GO TO DISK PAGE
DISK SETTING
REFORMAT
HD2 USAGE
BACKUP----------------FULL
ALARM
SELECT
MAIN PAGE
BACKUP PART TO HD2
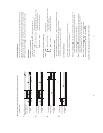
HD1
A 1 2001-02-01 12:20
2 2001-02-01 03:30 +
A 3 2001-03-02 04:20 +
4 2001-04-01 13:30
TOTAL: 41 M
READY TO GO
OK CANCEL
37
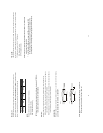
4.5.2 Secure Digital Card (SD Card) Backup
The SD card slot of the rear unit has three functions as shown below:
1. Archive Single image Clips into SD Card
Please take the following steps to archive a critical image in a SD card.
(1) Insert a SD Card into the SD card slot of the rear unit.
(2) Start playing back the recorded video. (When playing back recorded video made by a
multiplexer, you must get into the multiplexing mode and display picture by picture in
order to select the desired image for archiving. Press the Monitor button
to get into
the multiplexing mode under this mode so that the light of the Monitor button
is off
and the pictures are switching swiftly)
(3) Press the PAUSE button
to freeze the desired pictures.
(4) Press the Enter button
to save the image in the SD Card.
The quantity of pictures that can be stored depends on the SD card capacity. It depends
on SD card capacity how many pictures can be stored. You can have the saved images
printed out in any computer. The image is stored in the JPEG compressed format. If
more than one clip is stored in a SD card, file names will be assigned in sequence as
shown below.
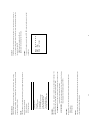
SAVE TO J0000.JPG
SAVE TO J0001.JPG
…
SAVE TO J000N.JPG
2. Backup the System setting info into SD Card.
The VR-601 offers a quick setup method by using a SD card. If a user wants to set many
VR-601 devices with the same settings, the VR-601 could save the whole setting in the SD card,
then transfer it to another DVR.
Save the whole setting into the SD card:
zInsert a SD card into the SD card slot.
zPress the Setup button
to enter the setup mode and select the SYSTEM.
zHighlight SYSTEM and press the Enter button
to enter the SYSTEM SETTING page.
zSet SD SETUP to SAVE. Then the system setting info will auto save into SD card.
Table 4.5.2 A. Compatible SD Cards
Manufacturer Capacity
Panasonic 32MB ~ 128MB
PQI 32MB ~ 128MB
Hagiwara 32MB ~ 128MB
NOTE: SD Cards not shown on this list have not been tested by the engineering team and are
not recommended for use with this product. For the latest updated list on the
recommended SD Cards, please contact your dealers or distributors.
* About the location of the buttons, please refer to Page 10 2.1 Front View.