


2-1
Installation
54-0194 Rev. D
2 Installation
TracVision LF/SF is designed for simple installation and setup.
Just follow these easy steps:
Step Refer to Section...
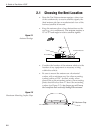
1. Choose the antenna location 2.1
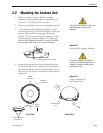
2. Mount the antenna unit 2.2
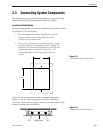
3. Connect the system components 2.3
4. Activate the IRD 2.4
5. Check out the system 2.5
Tools and Materials Required
• Electric drill
•
3
⁄16"-drill bit and
3
⁄4" hole saw and auger bit
• #2 Phillips and #0 flat tip screwdrivers
• Silicone sealant or RTV
•
7
⁄16"-open end wrench
• Adhesive suitable for specific roof construction
and materials (e.g., Liquid Nails)
• Rivet gun and
3
⁄16"-rivets (or other fastener suitable
for specific roof construction)
• (Recommended) PC with terminal emulation
software such as Windows Hyperterminal or
PROCOMM and a DB9 (male-to-female) PC data
cable
Kitpack Contents
Table 2-2 lists the materials provided in the kitpack.
Part Qty. KVH Part No.
Switchplate Assembly 1 02-1236-01
Tie-wraps 5 22-0013
3
⁄8" Hole Plugs 2 19-0282-06
RJ11 Handset Cable 1 32-0724-25
Clam Shell Ventilator 1 19-0230
#6 x
3
⁄4" Thread-forming Screws 5 14-0298-12
IRD Ground Wire (50 ft) 1 32-0583-50
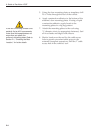
Plan the entire installation before
proceeding! Take into account
component placement, cable
running distances between units,
and accessibility to the equipment
after installation.
While some DIRECTV IRDs
offer on-screen messages, it is
recommended that a PC be
available for all installations of
DIRECTV, EchoStar, and
ExpressVu.
Table 2-2
Kitpack Contents
Table 2-1
Installation Process