


56
Changing the unit’s settings (continued)
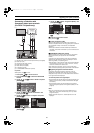
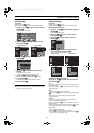
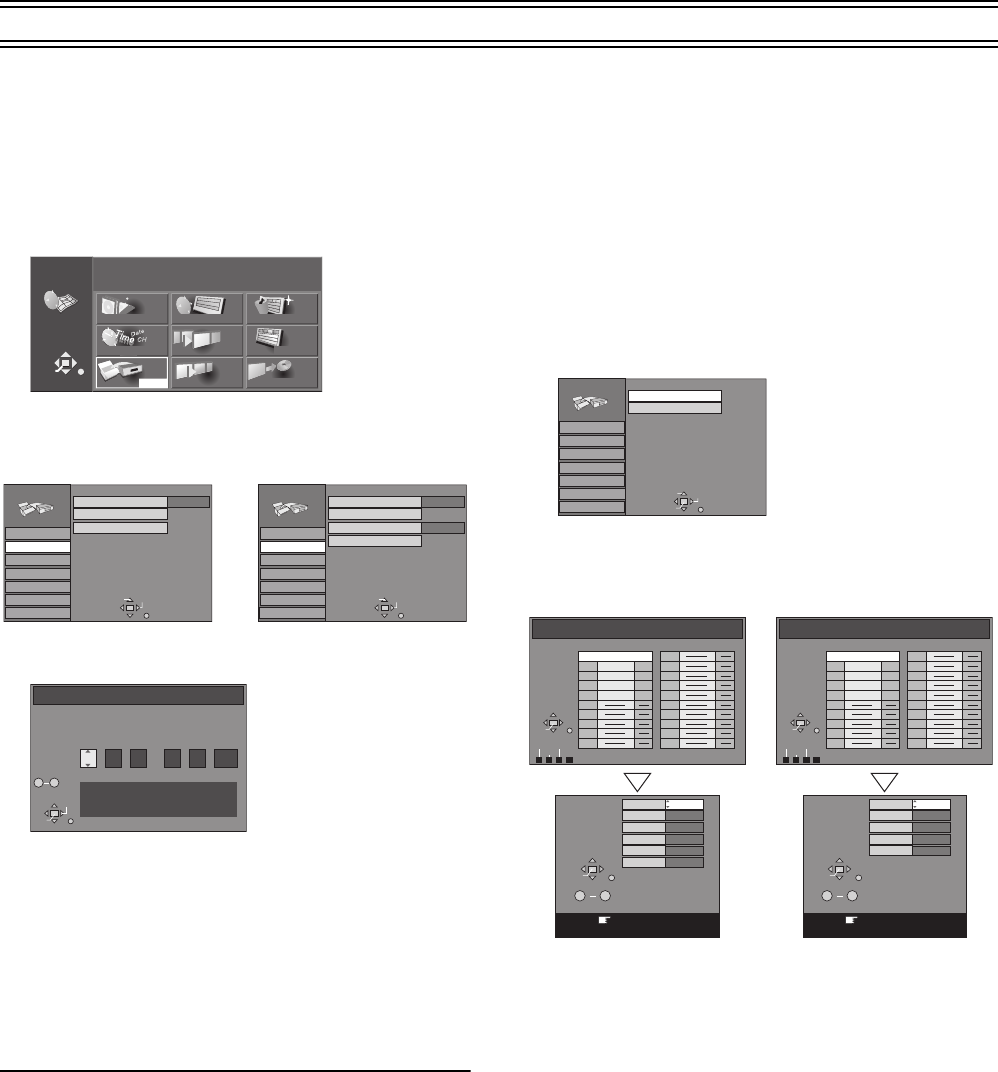
Clock Settings
Preparations
≥Switch [DVD, TV] (15) to “DVD”.
≥Press [FUNCTIONS] (11) to show the FUNCTIONS window.
1 Use [3, 4, 2, 1] (10) to select “SETUP” and press
[ENTER] (10).
≥The SETUP screen appears.
2 Use [3, 4] (10) to select the “Settings” tab and
press [2] or [1] (10).
(DMR-E51GCS) (DMR-E50GN)
3 Use [3, 4] (10) to select “Clock” and press
[ENTER] (10).
4 Use [2, 1] (10) to select the item you want to
change.
≥The items change as follows:
Hour>Minute>Second>Day>Month>Year
5 Use [3, 4] (10) to change the setting.
≥You can also use the numeric buttons (4) for setting.
6 Press [ENTER] (10).
≥The SETUP screen reappears and the clock starts.
7 Press [RETURN] (23).
Note
≥In the event of a power failure, the clock will operate on its back
up system for a minimum of 3 years.
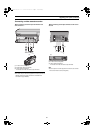
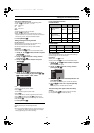
Channel Settings
Preparations
≥Switch [DVD, TV] (15) to “DVD”.
≥Press [FUNCTIONS] (11) to show the FUNCTIONS window.
Selecting the manual tuning
1 Use [3, 4, 2, 1] (10) to select “SETUP” and press
[ENTER] (10).
≥The SETUP screen appears.
2 Use [3, 4] (10) to select the “Tuning” tab and
press [2] or [1] (10).
3 Use [3, 4] (10) to select “Manual” and press
[ENTER] (10).
4 Use [3, 4] (10) to select the TV station that you
want to tune and press [ENTER] (10).
≥The TUNING BOX screen appears.
(DMR-E51GCS) (DMR-E50GN)
Handling the TUNING BOX screen
Use [3, 4, 2, 1] (10) to select the desired field and
press [ENTER] (10).
Pos:
To change the order in which the TV stations are assigned to the
programme positions.
Press the numeric buttons (4) to enter the number of the desired
programme position.
Name:
To enter or change the name of a TV station.
Use [3, 4, 2, 1] (10) to enter station name and press [ENTER]
(10).
≥If the station name needs a blank space, select the blank
between [Z] and [¢].
Channel:
To enter newly available TV stations or change the channel
number of an already tuned TV station.
Press the numeric buttons (4) to enter the channel number of the
desired TV station.
≥Wait a few moments until the desired TV station has been tuned.
≥After the desired TV station is tuned, press [ENTER] (10).
Fine Tuning:
To obtain the best tuning condition.
Use [3, 4] (10) to obtain the best tuning condition.
≥If you do not want to change the tuning condition, Use [1] (10)
to return to the original condition [Auto].
N
S
N
S
Disc Protection
DIRECT NAVIGATOR
CREATE PLAY LIST
PLAY LIST
TIMER RECORDING
TOP PLAY
FLEXIBLE REC
Off
Cartridge Protection
Off
FUNCTIONS
SELECT
ENTER
RETURN
DISC INFORMATION
PLAY
SETUP
DVD-RAM
Tab
SELECT
Remote
Tuning
SETUP
RETURN
Settings
Disc
Picture
Sound
Display
Connection
Clock
Shipping Condition
DVD 1
Tab
SELECT
Remote
Tuning
SETUP
RETURN
Settings
Disc
Picture
Sound
Display
Connection
Clock
Country
Shipping Condition
DVD 1
Others
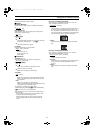
Clock
Time: Date:
15
:
45 :
39
1
. 8
.
2006
ENTER
RETURN
CHANGE
Please set clock.
ENTER : access , RETURN : leave
SELECT
0 9
No.
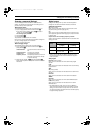
Manual
Tuning
SETUP
RETURN
Settings
Disc
Picture
Sound
Display
Connection
Auto-Setup Restart
SELECT
ENTER
TAB
Manual Tuning
Pos
Name
Ch
ENTER
RETURN
SELECT
Pos
Name
Ch
B C D
A
Delete
Add
Move
1 ARD 4
2 ZDF
2
3 N3
5
4 HR3
8
5 BR3 10
6
7
8
9
10
11
12
13
14
15
16
17
18
19
20
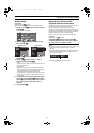
Pos
Name
Channel
Fine Tuning
Audio mode
Mono
1
BG
4
Auto
RETURN : leave
ENTER : store
Manual
Tuning
ARD
Off
ENTER
RETURN
CHANGE
0 9
Manual Tuning
Pos
Name
Ch
ENTER
RETURN
SELECT
Pos
Name
Ch
B C D
A
Delete
Add
Move
1 ARD 4
2 ZDF
2
3 N3
5
4 HR3
8
5 BR3 10
6
7
8
9
10
11
12
13
14
15
16
17
18
19
20
Pos
Name
Channel
Fine Tuning
Mono
1
Off
4
Auto
RETURN : leave
ENTER : store
Manual
Tuning
ARD
ENTER
RETURN
CHANGE
0 9
DVD(PAL).book 56 ページ 2003年5月22日 木曜日 午後12時3分