


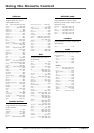
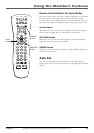
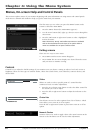

Chapter 4 25
Using the Menu System
Graphics contained within this publication are for representation only.
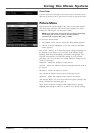
Advanced Settings
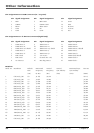
Near the bottom of the PICTURE menu is the Adv. Settings menu choice,
which allows you to adjust more specific settings, such as color warmth,
high contrast, and the comb filter.
Note: Some menu items and options may not appear depending on
the input the monitor is tuned to and the incoming resolution (for
example, 480i, 720p, or 1080i).
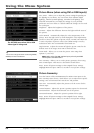
Color Warmth Automatically adjusts the color temperature of the picture.
Press the right arrow to scroll through the color adjustments: Cool for a
more blue palette of picture colors; Normal; and Warm for a more red
palette of picture colors. The 6500D setting is used by technicians and is
not recommended for normal use.
High Contrast Adjusts the amount of light the picture emits for the
darkest areas of an image. Press OK to check the box.
Comb Filter Separates the chrominance from the luminance to produce a
more accurate color. If a component is connected to the monitor using the
composite video or S-Video and the picture lacks detail, press OK to
check the box.
Noise Reduction Reduces the picture “static” or any type of interference.
Press OK to check the box.
Film Mode Detects and converts film content for better display with
minimal artifacts. If you’re watching a movie, press OK to check the box.
Zoom Mode Allows you to zoom the picture ratio using these options:
4:3, 16:9, Zoom 16:9, Zoom 16:9 Subtitles, Zoom 14:9, and Cinerama.
Notes: When using the RGB and DVI inputs, the only available
zoom options are 16:9 and 4:3.
Cinerama is not available when using component video
(Y Pb Pr).
Reset Resets all picture settings to their original factory settings. Highlight
Reset and press OK for 5 seconds to reset picture settings.
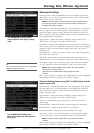
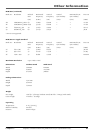
Advanced Settings (when using CMP1 or CMP2 inputs and the
signal source is 2H)
Color Warmth Automatically adjusts the color temperature of the picture.
Press the right arrow to scroll through the color adjustments: Cool for a
more blue palette of picture colors; Normal; and Warm for a more red
palette of picture colors.
High Contrast Adjusts the amount of light the picture emits for the
darkest areas of an image. Press OK to check the box.
Auto Size Automatically adjusts the picture to fit the screen for the
chosen input.
Vertical Position Adjusts the picture’s position upward or downward.
Horizontal Size Adjusts the horizontal size of the picture.
Horizontal Position Adjusts the picture’s position left or right.
Zoom Mode Allows you to zoom the picture ratio using these options:
4:3, 16:9, Zoom 16:9, Zoom 16:9 Subtitles, Zoom 14:9, and Cinerama.
Note: Cinerama is not available when using component video
(Y Pb Pr).
Reset Resets all picture settings to their original factory settings. Highlight
Reset and press OK for 5 seconds to reset picture settings.
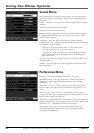
The ADVANCED SETTINGS menu
when standard video signal is being
used.
The ADVANCED SETTINGS menu
when a 2H component video signal is
being used.
Tip
You can also change the Zoom modes using ZOOM,
CINEMA, and the arrow buttons.