


– 7 –
8
-EN
Getting Started
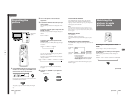
INPUT SELECT
VIDEO
R
L
AUDIO
VIDEO 2 IN
RESET
RGB AUDIO
RGB 2 IN
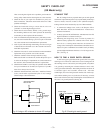
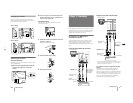
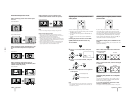
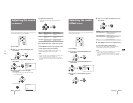
Connecting to a Macintosh or
compatible computer
Connect the RGB 2 IN connector on the front or the
RGB 1 IN connector at the rear of the monitor to the
video/audio outputs of the computer using the
supplied RGB signal cable (D-sub 15 pin ˜ D-sub 15
pin) and the supplied Macintosh adaptor.
Using the front RGB 2 IN connector
Using the rear RGB 1 IN connector
About the supplied Macintosh adaptor
The supplied Macintosh adaptor is compatible with
Macintosh LC, Performa, Quadra and Power
Macintosh series computers. Macintosh II series and
some version of PowerBook models may need an
another adaptor with micro switches (not supplied).
Front of the monitor
RGB signal cable
(supplied)
Macintosh adaptor
(supplied)
to video output
Audio connecting
cord
(stereo minijack ˜
stereo minijack)
(not supplied)
to audio output
Macintosh or compatible
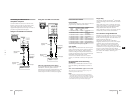
computer
Rear of the monitor
RGB signal cable
(supplied)
Macintosh adaptor
(supplied)
to video output
to audio output
Macintosh or compatible
computer
Audio connecting
cord
(phono plug × 2 ˜
stereo minijack)
(not supplied)
RGB 1 IN
AUDIO
L
R
RGB
VIDEO IN
S VIDEO
VIDEO
R
L
AUDIO
VIDEO
OUT
13
Getting Started
9
-EN
EN
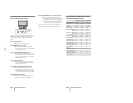
Preset and user modes
Preset modes
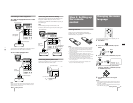
The monitor has nine factory preset modes for the most
popular industry standards as shown below.
No. Resolution Horizontal Vertical Graphics
(dots × frequency frequency mode
lines) (kHz) (Hz)
1 640 × 400 31.468 70.086 VGA mode
(Text)
2 640 × 480 31.468 59.94 VGA mode
(Graphics)
3 800 × 600 37.879 60.317 SVGA VESA
4 800 × 600 46.875 75.000 SVGA VESA
5 1024 × 768 48.363 60.004 VESA
6 864 × 480 31.469 59.94 Sony Wide-VGA*
7 1072 × 600 37.879 60.317 Sony Wide-SVGA*
8 1376 × 768 48.363 60.004 Sony Wide-XGA*
9 640 × 480 34.954 66.667 Macintosh 13" color
* For the timing chart of the signals, see page 28.
User modes
When using a video mode that is not one of the preset
modes, some fine tuning may be required to optimize
the display to your preference. Simply adjust the
monitor according to the adjustments instructions on
page 16. The adjustments will be stored automatically
and recalled whenever that mode is used.
A total of 15 user-defined modes can be stored in
memory. If a 16th mode is entered, it will replace the
first.
Recommended horizontal timing
conditions
Horizontal sync width should be more than 1.0 µsec.
Horizontal blanking width should be more than 3.6
µsec.
When “OUT OF SCAN RANGE” appears on the screen
The monitor receives a signal whose frequency range is not
within that specified for the monitor.
Notes
• When projecting a Wide-VGA, Wide-SVGA or Wide-XGA
signal, set the picture mode to FULL. In NORMAL mode, the
picture with aspect ratio 16:9 will be compressed to aspect ratio
4:3 and appear lengthened vertically. For details, see page 15.
• The monitor does not accept an interlace mode signal.
Plug & Play
This monitor complies with the DDC
TM
1 and DDC2B
which are the Display Data Channel (DDC) standards
of VESA.
When a DDC1 host system is connected, the monitor
synchronizes with the V. CLK in accordance with the
VESA standards and outputs the EDID (Extended
Display Identification Data) to the data line.
When a DDC2B host system is connected, the monitor
automatically switches to each communication.
For customers using Windows 95
Install the new model information from the “Windows
95 Monitor Information Disk” into your PC. (To install
the file, refer to the supplied “About the Windows 95
Monitor Information Disk/File.”)
This monitor complies with the “VESA DDC”
Plug&Play standard. If your PC/video card complies
with DDC, select “Plug and Play Monitor (VESA
DDC)” as “Monitor type” from “Control Panel” in
Windows 95. Some PC/video cards do not comply
with DDC. Even if your computer complies with DDC,
it may have some problems connecting with this
monitor. In this case, select this monitor’s model name
(KL-W7000 or KL-W9000) as “Monitor type” in
Windows 95.