


Performance Check and Calibration Procedures
TPG20 Service
1–19
Adjustment Procedure
Remove TPG20 top cover to gain access to adjustments and test links.
1. LCD Contrast Adjustment
a. Connect the TPG20 to an ac power source, and turn the power on.
b. Adjust – RV1 on the back of the front panel board to set the LCD
contrast ratio. The readout should be easily visible under normal
lighting conditions
2. Enter Factory Setup Mode
NOTE. for the following calibration steps the Factory Setup Mode must be
enabled. This allows the instrument to store factory calibration constants in
nonvolatile RAM.
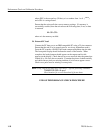
a. Turn the TPG20 power off.
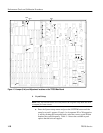
b. Connect a clip lead from TP17 (see Figure 1–3) to ground.
c. Hold down the SYSTEM button while turning the TPG20 power on.
The TPG20 display should indicate “Factory setup mode” as long as the
SYSTEM button is held down.
3. Serial Port Setup
a. Press the SYSTEM button until the “Set:RS232 speed” menu appears.
b. Rotate the knob until a baud rate of ”9600” appears on the bottom line of
the display.
c. Press the SELECT button to save the setting.