


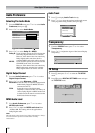

36
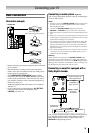
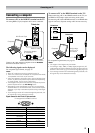
Connecting your TV
Selecting the PC/HDMI1 audio mode
You can select PC audio or HDMI1 audio when using this
function (- page 35).
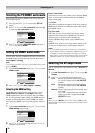
1 Press M, then press Y or Z to display the SET UP
menu.
2 Press V or U to select AV connection, then press Q
to display the AV connection menu.
3 Press V or U to select PC/HDMI1 audio, then press Y
or Z to select PC or HDMI1.
Setting the HDMI1 audio mode
You can select sound of an HDMI or DVI device connected to
the HDMI1 input terminals (- page 35) from three modes:
Auto, Digital or Analog.
Note:
This function is available only when the PC/HDMI1 audio mode
is set to
HDMI1.
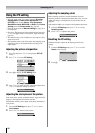
1 From the AV connection menu, press V or U to select
HDMI1 audio.
2 Press Y or Z to select Auto, Digital or Analog.
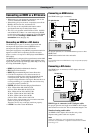
Selecting the HDMI setting
The HDMI setting menu consists of the following 3 items:
Deep Colour, x.v.Colour and Lip Sync. Some early
HDMI equipment may not work properly with your HDMI
TV. If you experience trouble, unplug your HDMI cable first
and then try setting these three options to Off. This should
allow your early HDMI source to operate properly with your
TV.
1 From the AV connection menu, press V or U to select
HDMI setting, then press Q.
2 Press V or U to select each item, then press Y or Z to
select the desired setting.
Deep Colour mode
This function increases the available colours from the HDMI
source to increase the boundaries defined by the RGB or
YCbCr colour space.
x.v.Colour
This function expands the acceptable colour range (limits) of
HDMI signals, then allows sending the wider colour signals
from HDMI sources.
Lip Sync mode
This option activates an auto audio/video display timing
adjustment function that allows HDMI source devices to
accurately perform synchronization automatically.
All above HDMI settings require a proper HDMI source
device.
If HDMI source products do not support these functions, the
TV may not work properly by activating these functions.
Notes:
• In a non-HDMI signal mode, this function is not available.
• If your HDMI connection is capable of 1080p and/or your TV
is capable of refresh rates greater than 60Hz or supports
Deep Colour, you will need a Category2 cable. Conventional
HDMI/DVI cables may not work properly with this mode.
Selecting the AV output mode
You can select the AV output from three modes; ATV, DTV or
Monitor.
1 From AV Connection menu, press V or U to select AV
Output.
2 Press Y or Z to select the desired output mode.
ATV: Selected programmed channel from Analog
TV system is output from the AV OUTPUT
terminal.
DTV: Selected programmed channel from Digital
TV system is output from the AV OUTPUT
terminal.
Monitor: The AV output depends on the selected video
input mode.
(e.g. If o1 is selected (- page 25), the AV
signal input to o1 is output from the AV
OUTPUT terminal.
Note:
When it is set to Monitor (and in DTV mode) or DTV, and the
digital programme is locked, the output will be blank and audio
will be muted.
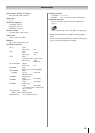
MENU
Back Watch TV
EXIT
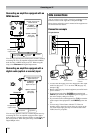
PC/HDMI1 audio
HDMI1 audio
AV connection
PC
Digital
HDMI setting
AV output
ATV
OK
MENU
Back Watch TV
EXIT
PC/HDMI1 audio
HDMI1 audio
AV connection
HDMI1
Auto
HDMI setting
AV output
ATV
OK
MENU
Back Watch TV
EXIT
Deep Colour
x.v.Colour
HDMI setting
On
On
On
Lip Sync