


QR404 User Manual
7
Chapter 4: DVR Boot up
4.1: System Initialization
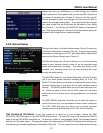
After connecting the power adapter and turning on the power button, the
system will boot-up and you will see a “System Initializing” message (See
Picture 1).
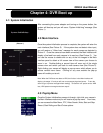
4.2: Main Interface
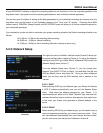
Once the system initialization process is complete, the system will enter the
main interface (See Picture 2). If the system does not detect video input,
you will receive a “Video Loss” message for each camera as depicted in
Picture 2. Once the cameras have been connected, the Main Interface will
display a live feed from each camera in its own box (See Picture 2). You
can use the mouse to double-click on any of the live images in the Main
Interface panel to obtain a full screen view of the camera you choose to
zoom in on. Double-clicking a second time will zoom out of the single
camera view and switch you back to multi-camera view (See Picture 2).
Right-clicking your mouse will display a pop-up menu which allows you to
access various menu items. Clicking on any area outside the pop-up
menu will enable you to exit.
Note: When the DVR does not detect a HDD, the first box in the Main Interface will
display a character “H” and you will hear an accompanying alarm buzzer. To turn the
alarm off, go to [Device manageAlarm setting]. Choose the “off” option next to “HDD
loss, HDD space not enough and alarm output”.
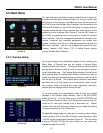
4.3: Pop-Up Menu
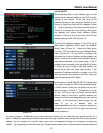
Once the System Initialization process is through, right-click your mouse in
the Main Interface mode and you will receive a pop-up menu. From here,
you can access the Main Menu, PTZ, Video Search, Mute, Start and Stop
Record, Start Rolling and Start Cruise options.
(Picture 1)
(Picture 2)
(Picture 3)