


QR404 User Manual
23
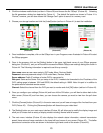
2. Click the windows mobile folder (red box in Picture 39) and choose the file “QQeye” (Picture 40). Selecting
the file generates a dialog box depicted by Picture 41. The default file location as shown in Picture 41 is
“Device”; however, you can also choose the “Storage Card” option to save it to a memory card.
3. Choose your storage location and click the [Install] button (red box in Picture 41) to start the installation.
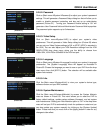
4. Once installation is complete, click on the QQeye icon in your Programs menu illustrated in Picture 42 to start
the QQeye program.
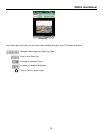
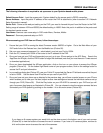
5. Once in the program, click on the [Setting] button in the upper right hand corner of your QQeye program
dialog box (Picture 43), and you will be able to access the Mobile QQeye user settings dialog box shown in
Picture 44. The Following information is required to set this up correctly:
User name: same as user name setup in DVR under Menu, Devices, Mobile
Password: same as password setup in DVR under Menu, Devices, Mobile
Server address: Public IP address of router DVR is connected to.
Web port: Same as the Server Port you setup in the DVR, it needs to be forwarded to the IP address of the
DVR, setting range is between 1024 and 65535, the default setting is 18600. Note: this port is in addition to
the ports used for standard remote access.
Channel: Select the channel from the DVR you want to monitor and click [OK] button (red box in Picture 44).
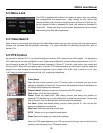
6. Once you configure your settings (Picture 44) and have hit the OK button, you will then be taken back to the
Main screen (Picture 43) and from here, you can choose the camera you want to view from the pull down
menu.
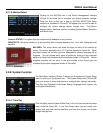
7. Click the [Connect] button (Picture 43) in the main menu and you will see an image of the live feed from your
DVR (Picture 45). Clicking the [Disconnect] button will discontinue your video feed.
8. The [Setting] button on your main menu interface (Picture 43) will allow you to modify the display image and
allow you to choose from a variety of display modes including: Normal and full-screen.
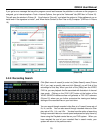
9. The main menu interface (Picture 43) also displays the network status information, network transmission
speed, frame rate and image resolution in the lower left hand corner of your screen (Picture 45). The buffer
percent and connection errors are shown in the bottom right hand corner of the screen (Picture 45).
(Picture 42)
(Picture 43)
(Picture 44)