


QR404 User Manual
13
an IP address and be directed to whatever the current dynamic IP address is, so that you can always access the DVR
by entering the same address. This DVR also supports the DDNS service provided by dyndns. You can get more
information on how to use these services from the myq-see.com or www.dyndns.com website.
5.2.3.4: Port Forwarding
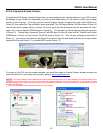
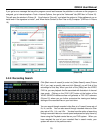
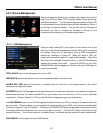
To access the DVR from a remote computer over the internet you will need to forward port 80 and port 9000 of the
Router the DVR is attached to, to the IP address of the DVR. You can get instructions on how to do this for most
popular routers by going to
www.portforward.com. Once there, click on the orange “Routers” hyperlink in the second
paragraph as shown in Picture 12. Find the link to the brand and model of your router from the list of manufacturers
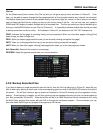
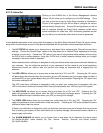
and click the “next button”. From there, click on the orange “Default Guide” link (BLUE box in Picture 13). This will
take you to the port forwarding instructions for your router.
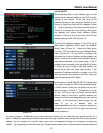
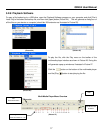
When you access the DVR from a remote computer you also need to use a different address in the Internet Explorer
browser window. Instead of entering the IP address of the DVR you need to enter the public IP address of the router
the DVR is attached to. You can get this address by going to
www.myipaddress.com from a computer that is attached
to the same router as the DVR. This website will display your address as illustrated in Picture 14. The example
below shows an IP Address of 76.254.183.54. Please make sure to take note of the address that you obtain for your
own Router and use it accordingly.
(Picture 14)
(Picture 12)
(Picture 13)