


QR404 User Manual
9
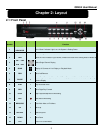
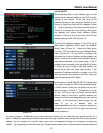
5.2: Main Menu
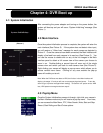
The right-click menu in the Main Interface mode (Picture 3) allows you
to access the Main Menu interface (Picture 4). You can use the right
click function of the mouse or the Menu button on the front panel of
the DVR to enter into the Main Menu interface. Use the mouse or the
FWD and REW button on your DVR’s front panel or remote control to
navigate around the Main Menu Interface and select the icon of the
program you wish to access (See Picture 4). Use the ESC button on
your DVR’s front panel to return to the previous window of the Main
Menu interface. Set your management permissions, configure your
devices, customize your recording parameters, and access your
System Functions (such as time, date and passwords) through the
Main Menu Interface. You can also configure the controls for your
Camera, Network, HDD, Alarm, PTZ, & Mobile Phone controls
through the Main Menu Interface.
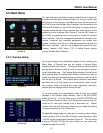
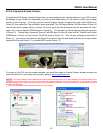
5.2.1: Camera Setup
To set up the display name and position display of each camera, go to
[Main Menu Camera] and you will receive a Camera Setup
interface (Shown as Picture 5). Through the Camera Setup interface,
you are able to choose a name for each of your connected cameras
up to 8 characters long. The Camera Setup interface (Picture 5) also
gives you the ability to choose which camera channels you wish to
enable live viewing of and which camera channels you wish to set up
with the ability to record. The Camera Setup interface is also where
you would set your DVR system up to automatically rotate through
your camera views and adjust the image brightness, saturation,
contrast and hue settings of each camera as well.
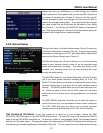
To set your system up to automatically rotate through your viewed
cameras in the Camera Setup interface, click on the [AUTOSEQ]
button (Picture 5). This will initiate a pop up AUTO ROTATION sub
menu (Picture 5A) that will allow you to choose the amount of time you
would like to view each camera from a drop-down list. Default
rotation time is set at 5 Seconds. However, you can adjust this setting
to range anywhere from 0 to 10 Seconds.
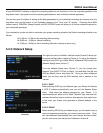
To adjust the image brightness, saturation, contrast and hue settings
of each camera, click on the [SETUP] button under the column titled
“COLOR” on the Camera Setup interface (Picture 5). This will initiate
a pop-up [COLOR SETUP] sub menu where you can make your
desired changes (Picture 5B).
(Picture 5A)
(Picture 4)
(Picture 5)