


QR404 User Manual
11
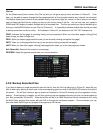
(Picture 8)
of your SCHEDULE interface to adjust the recording options for all channels or from the channels specified in the
drop down menu if you prefer to set the recording parameters for each individual channel separately.
You are also given the option of setting up the date parameters of your scheduled recordings by choosing from the
drop down menu on the bottom of your Schedule interface in the “From” and “To” options. Checking the ALARM
(motion record), GENERAL (always record) and NO RECORD boxes will allow you to further customize options for
your scheduled recordings.
If you decide that you do not wish to customize your system recording schedule, the Default recording schedule is as
follows:
Hr 01:00 am - 07:59 am: No recording (Not recording)
Hr 08:00 am - 18:59 pm: Normal recording
Hr 19:00 pm - 00:59 pm: Alarm recording (Record on activity or alarm only)
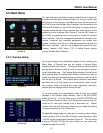
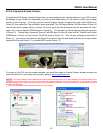
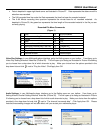
5.2.3: Network Setup
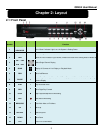
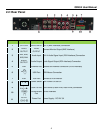
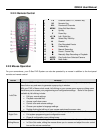
The right click menu in the Main Interface mode (Picture 3) allows you
to access the Main Menu interface (Picture 4). To set up the Network
settings of your DVR, go to [Main Menu] [Network Set] to enter into
[Network Setup] menu (Picture 7).
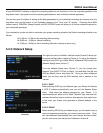
From the Network Setup menu (Picture 7), you can choose your
Network Type (DHCP, PPPoE, or Static), Port and Web Port (80 and
9000 by default) from a drop down list. Once you have configured
these, you can then view the DVR remotely over a network or the
internet.
5.2.3.1: DHCP
When selecting DHCP as your Network type, your Router will allocate
a DVR IP address automatically once you exit the Network Setup
menu. Write down the address assigned by your Router. It is
recommended you switch to the “Static” Network Type and enter the
address information here to avoid any discrepancies that might occur
in the event your Router auto generates a different address in the
future.
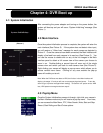
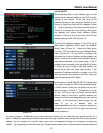
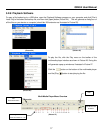
5.2.3.2: PPPoE
When selecting PPPoE as your Network type, you will need to input a
user and password provided by your internet service provider. Once
you have obtained those settings from your internet service provider,
you will need to set your web port as illustrated in Picture 8.
(Picture 7)