


QR404 User Manual
18
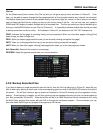
• Date is depicted in upper right hand corner as illustrated in Picture 27. Date represents the date current file
selection was recorded.
• The 24H recorded time line under the Date represents the time line base for recorded material.
• The 0~60 Minute recording time quantum represents the minute base for all recorded materials. As
depicted in Picture 30, the green bar represents the time length of the recorded material in the file you are
currently playing.
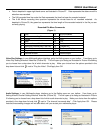
Recorded File Menu Commands
(Figure 1)
1
Play
10
All the windows
2
Previous recording file
11
Add window
3
Pause
12
Start
4
Stop
13
Cut
5
Previous frame / Next frame
14
Delete
6
Slow play, Normal play, Fast Play
15
Convert AVI
7
Next Hour
16
On Screen Display
8
Capture picture
17
Mute switch
9
Reduce window
18
Volume adjust
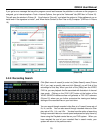
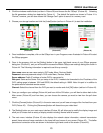
Video Play Settings: In your Multimedia player interface, got to the Setting menu on your toolbar. From there, go to
Video Play SettingNormal Video Bar (Picture 28). This will open up a dialog as illustrated in Picture 29 allowing
you to choose from a drop down list of which channels to play. Make your choice from the options provided in the
drop down list and click
next to “Play the Video”. Click Apply then OK.
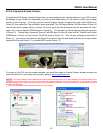
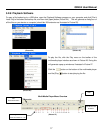
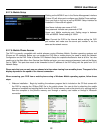
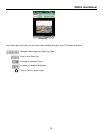
Audio Settings: In your Multimedia player interface, go to the Setting menu on your toolbar. From there, go to
SettingAudio Channel SettingNormal Video Bar (Picture 30). This will open up a dialog as illustrated in Picture
31 allowing you to choose from a drop down list of which audio channels to play. Make your choice from the options
provided in the drop down list and click
next to “The channel has sound data”. Click Apply then OK. Please
note that these setting changes will not take effect until you re-start your multimedia player.
(Picture 28)
(Picture 29)
(Picture 30)
(Picture 31)