


QR404 User Manual
10
Please note that any modifications you make through the Camera
Setup interface will not be applied until you click the [APPLY] button at
the bottom of the dialog box (Picture 5). Once you do this, you will
then be prompted to save your settings, and you must click [OK] in
order for the changes to take effect. If you wish to abort the changes
you made, simply click the [Exit] button on the bottom of your dialog
box (Picture 5). By clicking on the [DEFAULT] button at the bottom of
your Color Setup dialog box (Picture 5) all system default values will
be reset to their original factory installed settings.
5.2.2: Record Setup
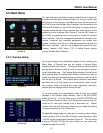
The right click menu in the Main Interface mode (Picture 3) allows you
to access the Main Menu interface (Picture 4). To set up the recording
parameters and settings of your DVR, go to [Main Menu] [Record] to
enter into the [Record Setup] menu (Picture 6).
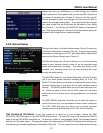
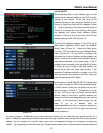
The [Record Setup] menu (Picture 6) allows you to turn the recording
status for each camera channel on and off, set the recorded image
quality and enable audio recording. This menu also allows you to
schedule your recording times and set your recording file sizes
through the quality setting.
The [RECORD] button on your Record Setup Menu (Picture 6) allows
you to turn each camera channel’s recording ability on or off. The
[QUALITY] button gives you the option of choosing the quality of your
recorded images from a drop down list for each individual camera
channel. The [AUDIO] button allows you to turn the audio input on or
off. When the audio is turned off, the DVR system will not record
audio and you will not hear sound during playback of your recorded
events.
The [REC MODE] drop down list allows you to setup the system to
record 24 hours a day, on a set schedule or when motion is detected.
The [FILE SIZE] drop-down list allows you to set the maximum
recording time for all recorded files to be 15, 30, 45 or 60 minutes.
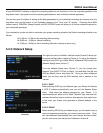
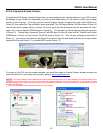
TIME SCHEDULED RECORDING: To set your system up to record on a time schedule, choose the TIME
SCHEDULE RECORD option on the REC MODE drop down list. To record 24 hours a day, choose the ALWAYS
option from the REC MODE drop down list. To record on motion or a set schedule, select Time Schedule Record
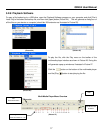
and click the “Schedule” option. Choosing this option will initiate a pop-up SCHEDULE interface which will allow you
to customize your scheduling options as illustrated by Picture 6A. You can choose from a pull down menu at the top
(Picture 5B)
(Picture 6A)
(Picture 6)