


28
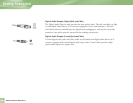
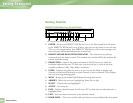
Choose the Setup That Suits You
There are several ways to connect your receiver to match your particular equipment setup and to gain
optimum signal quality. The following pages illustrate some of the most common setups. Keep in
mind that the back panels of your TV and other equipment may not exactly match those illustrated.
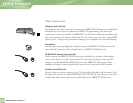
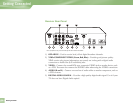
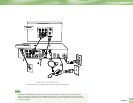
Connecting Your DIRECTV HD Receiver to a TV with an HDMI Input
1) Connect your satellite dish antenna to the DIRECTV HD Receiver. Connect the RG-6 coaxial
cable from your satellite dish to the jack labeled SATELLITE IN on the DIRECTV HD Receiver.
2) Connect the off-air antenna to the DIRECTV HD Receiver (optional). Connect the off-air
antenna to the jack labeled OFF-AIR IN on your receiver. When you run the Guided Setup, be
sure to select the Satellite & Antenna button when you reach the Satellite Dish & Off-Air Antenna
screen.
3) Connect the video from the DIRECTV HD Receiver to your TV. Connect the HDMI cables
to the HDMI jacks on the receiver and your TV. Note: HDMI cable is not included with
HD Receiver.
4) Connect the audio from the HD Receiver to your TV. Connect the white (L) and red (R)
RCA-type cables from the DIRECTV HD Receiver to your TV. Note: you can also connect
either optical or coaxial audio cable from your receiver to your audio equipment if they support
those formats.
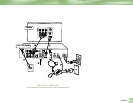
5) Connect the DIRECTV HD Receiver to a land-based phone line. Plug one end of the telephone
cord into a phone jack on your wall (or into a phone splitter that is plugged into a phone jack) and
the other end into the PHONE JACK on the back of the DIRECTV HD Receiver.
6) Connect the RF remote antenna to the DIRECTV HD Receiver (optional). If you want to use
your remote without having to point it at the receiver, such as from another room, or in a setup
where objects are likely to block the beam from your remote to your DIRECTV HD Receiver
(such as the receiver is in a cabinet with a door), then plug the RF remote antenna into the RF
REMOTE ANTENNA jack on your receiver. Your receiver defaults to IR functionality. To activate
RF functionality go to the System Setup screen, choose REMOTE in the left menu. Select IR/RF
Setup button and follow the on screen instructions.
7) Plug all power cords into electrical outlets.
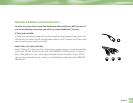
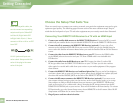
When working with cables, be
sure to connect corresponding
outputs and inputs (Video OUT
to Video IN, Right Audio OUT
to Right Audio IN, etc.). Never
connect an IN to an IN or an OUT
to an OUT.
All A/V jacks and inputs are
color coded. Always match the
color of the plug to the same
color of the jack.
OUT
IN
TIP
Choose the Setup That Suits You
Getting Connected