


Chapter 2
Page 28
Receiver Description and Installation
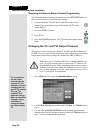
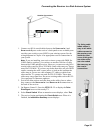
2. Select the Touch Tone or the Rotary/Pulse option in the Phone Type
list.
3. Select either the
No Prefix or the Prefix Code option in the Outside
Line Prefix
list.
Note: Usually, you need a telephone number prefix only for business
installations. For most residential installations, all you need to do is set
the telephone system type. The default setting of
No Prefix will allow
correct dialing. If this is the case, select the
Save option to save the
above setting, and stop here. If you do need to set a prefix, then instead
of selecting the
Save option, go on to step 4.
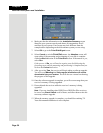
4. If you selected the
No Prefix option, select Save to finish.
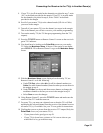
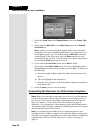
5. If you selected the
Prefix Code option, the receiver highlights the box
(highlighting the top box) where you must enter the digits. To do this, do
the following:
a) Enter the number of digits required to obtain an outside line in the
top box.
b) Move the highlight to the bottom box.
c) Enter the exact sequence you dial the phone to obtain an outside line
in the bottom box.
6. Select the
Save option to save the settings.
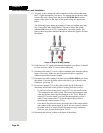
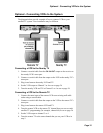
Connecting the Receiver to a Dish Antenna System
Note: Before you can begin connecting your receiver to your dish antenna,
you must first complete the preceding sections on connecting your TVs to
the receiver. Then if you are installing a dish antenna system for the first
time, see Chapter 4 - Dish Antenna Installation starting on page 85.
Otherwise, if you already have a dish antenna system installed and peaked
for maximum signal strength, complete the following instructions to connect
the dish antenna system to the receiver.
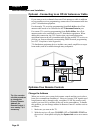
Note: You will need two available receiver connection points on your
installed switch or LNBF to complete this installation. If these ports are not
available, you may need to upgrade your system with different or additional
equipment. See DISH Pro Wiring Diagrams in Chapter 4 starting on
page 94.