


LC-XC1
24
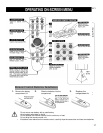
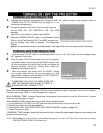
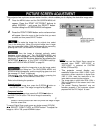
DIRECT OPERATION
Select COMPUTER mode by pressing the MODE button on
the Top Control or the COMPUTER button on the Remote
Control Unit.
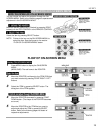
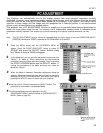
MENU OPERATION
1
Press the MENU button and the ON-SCREEN MENU
will
appear. Press the POINT LEFT/RIGHT buttons to select
Computer and press the SELECT button. Another dialog
box MODE MENU will appear.
2
Press the POINT DOWN button and a red-arrow icon
will
appear. Move the arrow to the mode either Computer 1
or
Computer 2, and then press the SELECT button.
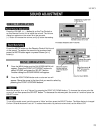
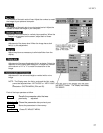
CURRENT MODE DISPLAY
When selecting the Computer Mode, the Current Mode display
appears to show the information of the computer being
selected.
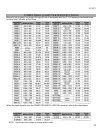
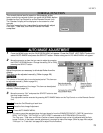
This projector automatically tunes to most different types of
computers based on VGA, SVGA, XGA or SXGA (refer to
“COMPATIBLE COMPUTER SPECIFICATION” on page
25). When selecting Computer, this projector automatically
tunes to
the incoming signal and projects the proper image
without any
special settings. (Setting of the Computer System
may be required when connecting some computers.)
Note : The projector may display one of the following messages.
Go to PC adj
I
The projector cannot discriminate or detect the input
signal from the computer. Adjust and set the
computer system manually. (Refer to page 26.)
No signal
I
There
is
no signal input from the computer. Make
sure the connection of the computer and the
projector is set correctly.
(Refer to TROUBLESHOOTING on page 42.)
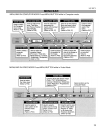
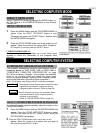
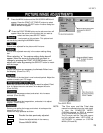
SELECT COMPUTER SYSTEM MANUALLY
To set the Computer system manually, select the mode on the
ON-SCREEN MENU.
1
Press the MENU button and the ON-SCREEN MENU will
appear. Press the POINT LEFT/RIGHT buttons to select
SYSTEM and press the SELECT button. Another dialog box
SYSTEM MENU will appear.
2
Press the POINT DOWN button and a red-arrow icon will
appear. Move the arrow to the system that you want to
set, and
then press SELECT button.
AUTOMATIC MULTI-SCAN SYSTEM