


75
EN
xxxx
VCR functions
Recording Playing discs EditingBefore you start Connections Getting started Others
Español
Changing the
Setup menu VCR functions
Recording
Playback
VCR
VCR
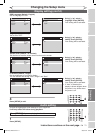
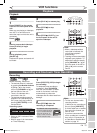
1
Press [POWER] on the remote
control or the front panel of the
unit.
When you are playing a videotape,
turn the TV on and be sure to
select the input to which the unit is
connected.
Press:
2
Insert a prerecorded videotape.
Press [PLAY B] to begin
playback.
3
During playback, press
[PAUSE F].
Playback will pause and sound will
be muted.
4
Press [PLAY B] to resume play.
5
Press [STOP C] to stop
playback.
6
Press [STOP C / EJECT A] on
the front panel of the unit to
eject the videotape.
Note
• When a videotape without
record tab is inserted, the
unit will start playback
automatically.
• Tracking will be automatically
adjusted upon playback. To
adjust the tracking manually,
press [CHANNEL L / K] on
the front panel of the unit or
[CH K / L] on the remote
control.
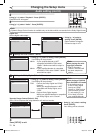
Recording and One-touch Timer Recording
VCR
VCR
Before recording, make sure:
•
The desired channel is selected
by pressing the Number buttons
or
[CH K / L]
on the remote
control or [
CHANNEL L / K]
on
the front panel of the unit.
•
There is a videotape with a
record tab in the unit.
•
The desired recording speed is
selected in SP (standard play) or
SLP (super long play) mode by
pressing [REC SPEED] on the
remote control.
Recording speed:
•
Stereo or SAP is selected. Refer
to page 21.
•
Refer to page 31 for instructions
on Timer Recording.
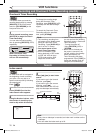
1
Press [REC/OTR] (VCR) to begin
the recording.
To temporarily stop recording or
to resume it, press [PAUSE F].
After the unit has been in Pause
mode for 5 minutes, it will stop
automatically to protect the
videotape and the video head from
damage.
2
Press [STOP C] when the
recording is completed.
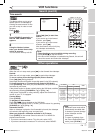
Note
• To view one channel while
recording another
1) While you are recording on
the unit, press [VIDEO/TV].
2) At the cable box or satellite
box, select the channel you
want to view.
If you have connected the
unit to a cable box or satellite
box, refer to “Connection to
a Cable Box or Satellite Box”
section on page 15.
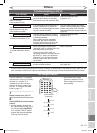
STOP
POWER
T-SET
TIMER PROG.
SKIP SKIP
OPEN/CLOSE
SPACE
1 2 3
4 5 6
7 8
0
9
CH
VIDEO/TV
SLOW
PAUSE
.@/:
ABC DEF
GHI JKL MNO
PQRS
REC/OTR
DISPLAY
TUV WXYZ
DVD
REC/OTR
REC SPEED
ZOOM
SEARCH
VCR
SETUP
CM SKIP
RETURN
MENU/LIST
TOP MENU
DUBBING
x1.3/0.8
CLEAR
ENTER
PLAY
AUDIO
1
2
4
5
STOP
POWER
T-SET
TIMER PROG.
SKIP SKIP
OPEN/CLOSE
SPACE
1 2 3
4 5 6
7 8
0
9
CH
VIDEO/TV
SLOW
PAUSE
.@/:
ABC DEF
GHI JKL MNO
PQRS
REC/OTR
DISPLAY
TUV WXYZ
DVD
REC/OTR
REC SPEED
ZOOM
SEARCH
VCR
SETUP
CM SKIP
RETURN
MENU/LIST
TOP MENU
DUBBING
x1.3/0.8
CLEAR
ENTER
PLAY
AUDIO
3
STOP
POWER
T-SET
TIMER PROG.
SKIP SKIP
OPEN/CLOSE
SPACE
1 2 3
4 5 6
7 8
0
9
CH
VIDEO/TV
SLOW
PAUSE
.@/:
ABC DEF
GHI JKL MNO
PQRS
REC/OTR
DISPLAY
TUV WXYZ
DVD
REC/OTR
REC SPEED
ZOOM
SEARCH
VCR
SETUP
CM SKIP
RETURN
MENU/LIST
TOP MENU
DUBBING
x1.3/0.8
CLEAR
ENTER
PLAY
AUDIO
1
1
2
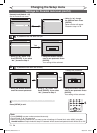
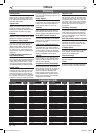
VCR
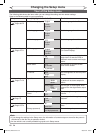
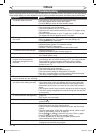
Tape speed
Type of tape
T160T120
Recording/Playback Time
T60
2-2/3hours2hours
1hourSP mode
8hours6hours3hoursSLP mode
Accidental erasure prevention
To prevent accidental record-
ing on a recorded videotape,
remove its record tab. To
record on it later, cover the
hole with cellophane tape.
Record tab
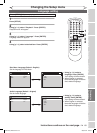
Playback
First:
VCR
E9A10UD_DVR90VG.indd 75 2005/12/26 18:56:18