


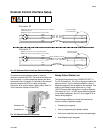

Setup
312759R 45
5. Change the mechanical ratio adjustment to the
desired setting (1.19 in the example) as follows.
a. Ensure the machine pistons are in the retracted
position.
b. Ensure the purge timer is off and the machine is
not in recirculation mode.
c. Use system air pressure regulator (105) to
decrease air pressure in the system to zero.
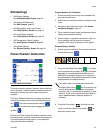
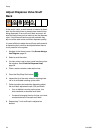
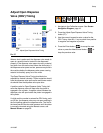
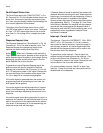
d. Navigate to the Manual screen. See Screen
Navigation Diagram, page 16.
e. Press the Extend Piston Command
button ( ).
f. Use the system air pressure regulator (105) to
slowly increase the air pressure until the ratio
beam (202) is parallel to the pump body.
g. Use system air pressure regulator (105) to
return the air pressure in the system to zero.
h. Press down the system air pressure relief
switch (106).
i. Close the shop ball valve supplying air to the
system.
j. Press the Machine Disable Mode key ( ).
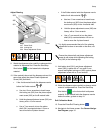
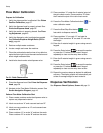
k. Loosen the socket head cap screw (203) on the
adjustment clevis. See F
IG. 28.
l. Loosen the hex head cap screws (204) on the
ratio adjustment pivot.
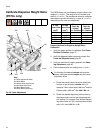
m. Turn the ratio adjustment knob (201) clockwise
to increase the ratio and counterclockwise to
decrease the ratio until the mechanical ratio arm
is set to the desired setting (1.19 in the exam-
ple).
n. Tighten the hex head cap screws (204) on the
ratio adjustment pivot.
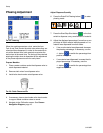
o. Slide the ratio beam guide (205) so there is
approximately a 0.5 mm gap between the ratio
beam guide (205) and the snap ring (206)
shown in F
IG. 29.
p. Tighten the socket head cap screw (203) on the
adjustment clevis.
q. Open the shop ball valve supplying air to the
system.
r. Lift up the system air pressure relief
switch (106).
s. Use system air pressure regulator (105) to
return to the standard operating air pressure for
your application.
Be sure the previous steps relieving system pres-
sure were completed before moving to the next step.
CAUTION
Damage to the ratio mechanism will result if the
proper clearance is not present.
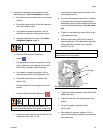
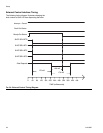
F
IG. 29: Ratio Beam Snap Ring
206
ti12630a
205
0.5 mm gap