


Setup
46 312759R
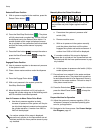
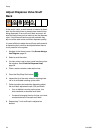
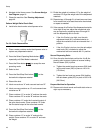
6. Navigate to the Home screen. See Screen Naviga-
tion Diagram, page 16.
7. Phase the machine. See Phasing Adjustment,
page 40.
Perform Weight Ratio Check Shot
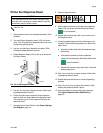
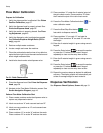
8. Install ratio check nozzle onto dispense valve.
9. Place a waste container under the dispense valve to
capture any dispensed material.
10. Press the Select Operating Mode button ( )
repeatedly until Shot Mode is selected.
11. Press the Enter button ( ) to accept the new
operating mode.
12. Select a shot.
13. Press the Start/Stop Shot button ( ) or the
foot-switch to dispense material.
14. Discard the shot.
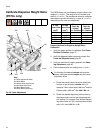
15. Label one scale as “A” and a second scale as “B”.
16. Label one new container as “A” and a second new
container as “B”.
17. Place container “A” on scale “A” and tare the scale.
Place container “B” on scale “B” and tare the scale.
18. Place container “A” under the A material output of
the ratio check nozzle. Place container “B” under
the B material output of the ratio check nozzle.
19. Press the Start/Stop Shot button ( ) or the
foot-switch to dispense material.
20. Place container “A” on scale “A” and note the
weight. Place container “B” on scale “B” and note
the weight.
21. Divide the weight of container “A” by the weight of
container “B” to get the weight ratio of the dispensed
materials.
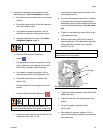
22. Repeat steps 16 through 21 at least two more times
for an overall total of at least three ratio check shots,
or repeat as needed.
23. If the average A to B ratio of the dispensed materials
is too high or two low, adjust the mechanical ratio
arm as required by repeating steps 5 through 22
until the dispensing ratio is correct.
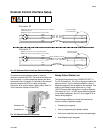
• If the A to B ratio is too high, turn the ratio
adjustment knob (201) counterclockwise to
adjust the mechanical ratio arm towards the 1:1
position.
• If the A to B ratio is too low, turn the ratio adjust-
ment knob (201) clockwise to adjust the
mechanical ratio arm towards the 2:1 position.
Secure Dispensing Ratio
24. Once the ratio check shots confirm the A to B dis-
pensing ratio is correct, tighten all screws holding
the ratio beam (202) in place.
a. Tighten the socket head cap screws (203) hold-
ing the ratio beam (202) in place to 140 in-lb
(15.8 N•m).
b. Tighten the hex head cap screw (204) holding
the ratio beam guide (205) in place to 350 in-lb
(39.5 N•m).
Prepare Machine for Operation
25. Remove ratio check nozzle and install static mixer or
night cap as necessary.
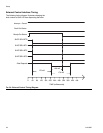
F
IG. 30: Ratio Check Nozzle
ti12392a